So for a while at the office we’ve had a VERY annoying problem with some of our higher-end laptops we use for STEM classes. It’s a problem that hasn’t really been reported by the end users, only by us in the Tech Office directly.  We have some Dell Precision M2800s with rather decent specs (which I won’t delve much into right now) except to say they do have marvelous 256GB Solid-State Drives installed in them.

When we first got them, we marveled at the speed of the devices.  They were blazing fast.  Everyone at the office wanted one.  We were strangely confused to some problems deploying a few packages but largely chalked it up to problems with the imaging servers (which were getting a little on the old side).

A few weeks after that we had to re-image the first one and the problems became evident.  Jobs that took ~5 minutes to run on a different model laptop were taking 30 minutes to run on these (beefier) laptops.  We were at a loss.

That being said, we largely pushed the problem aside (because there are bigger fish to fry on any given day!).  Today we had some time to delve into it, and we figured it out real quick all things considered.  I’ll let you see the picture which is probably enough proof.

image

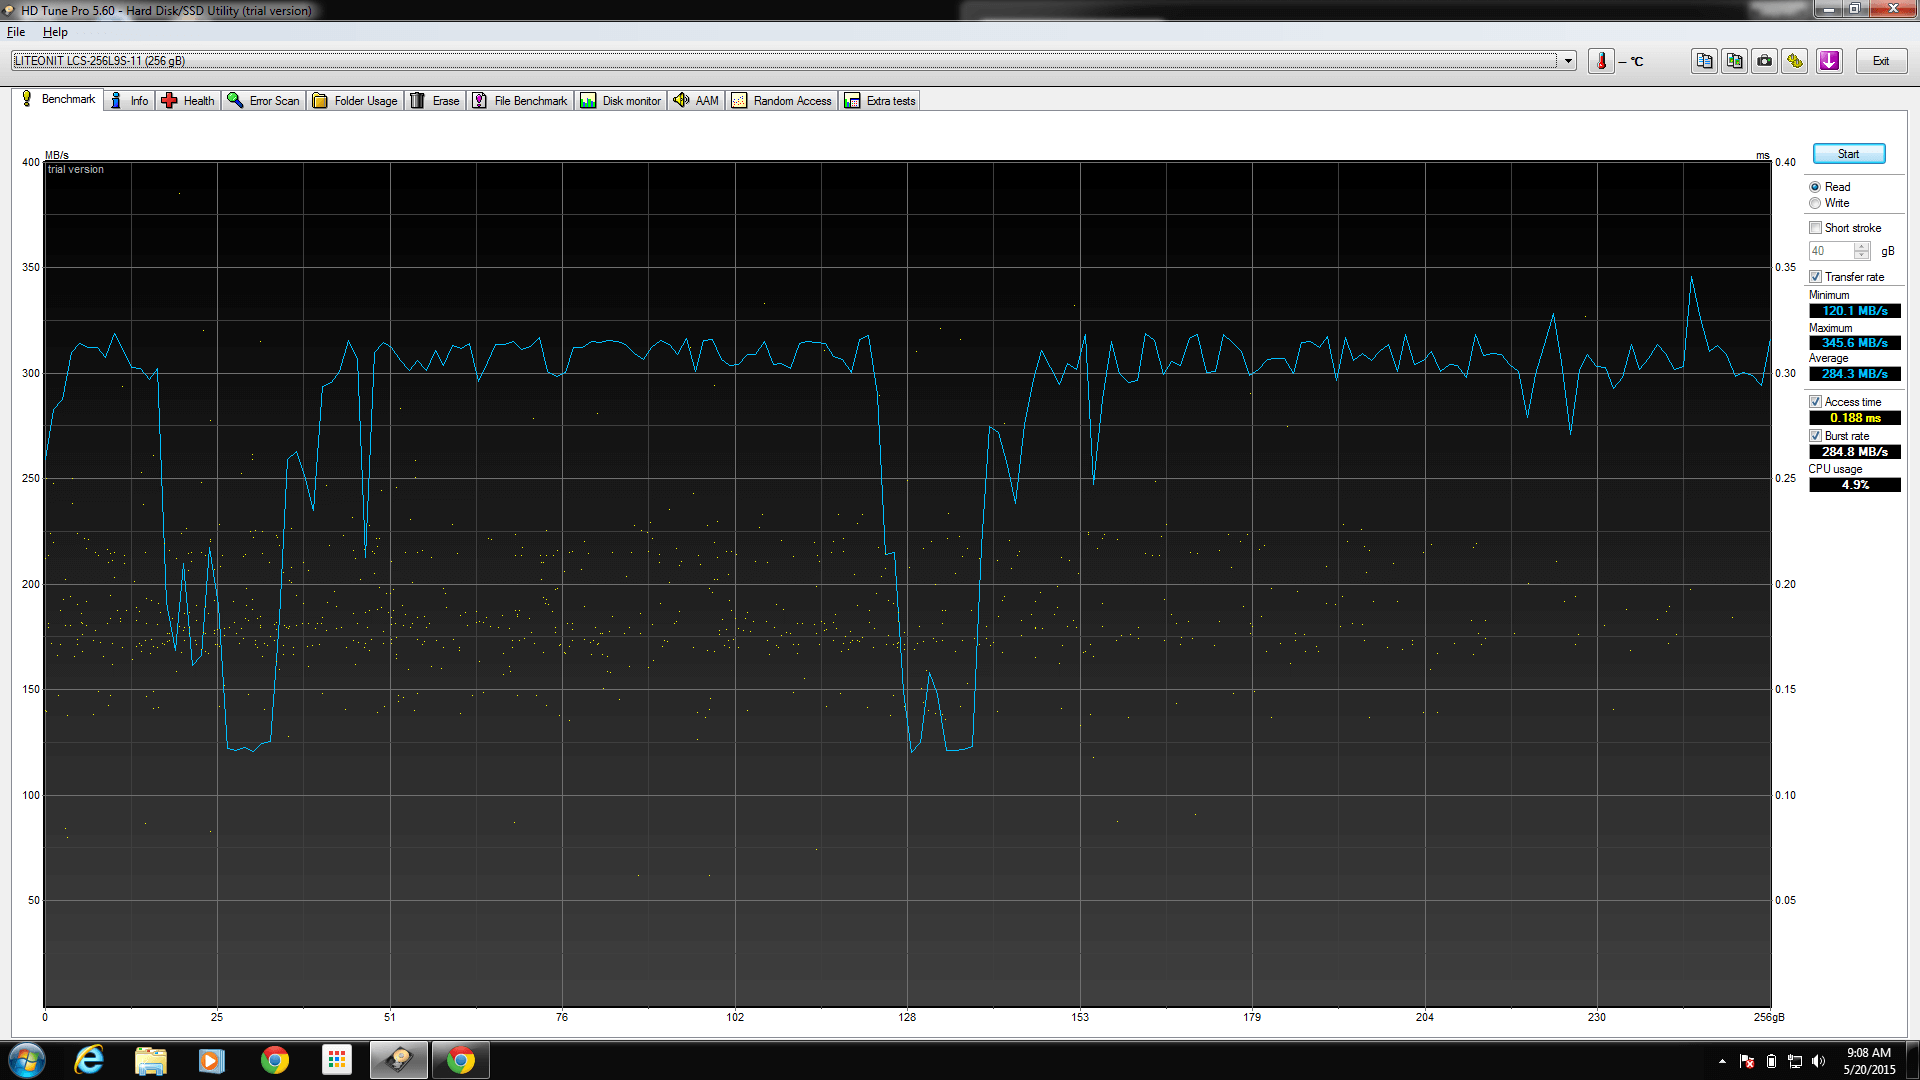
Figured it out yet?  Hint: power!  Still nothing?  Ok.

DriveDiagnostics

That’s right.

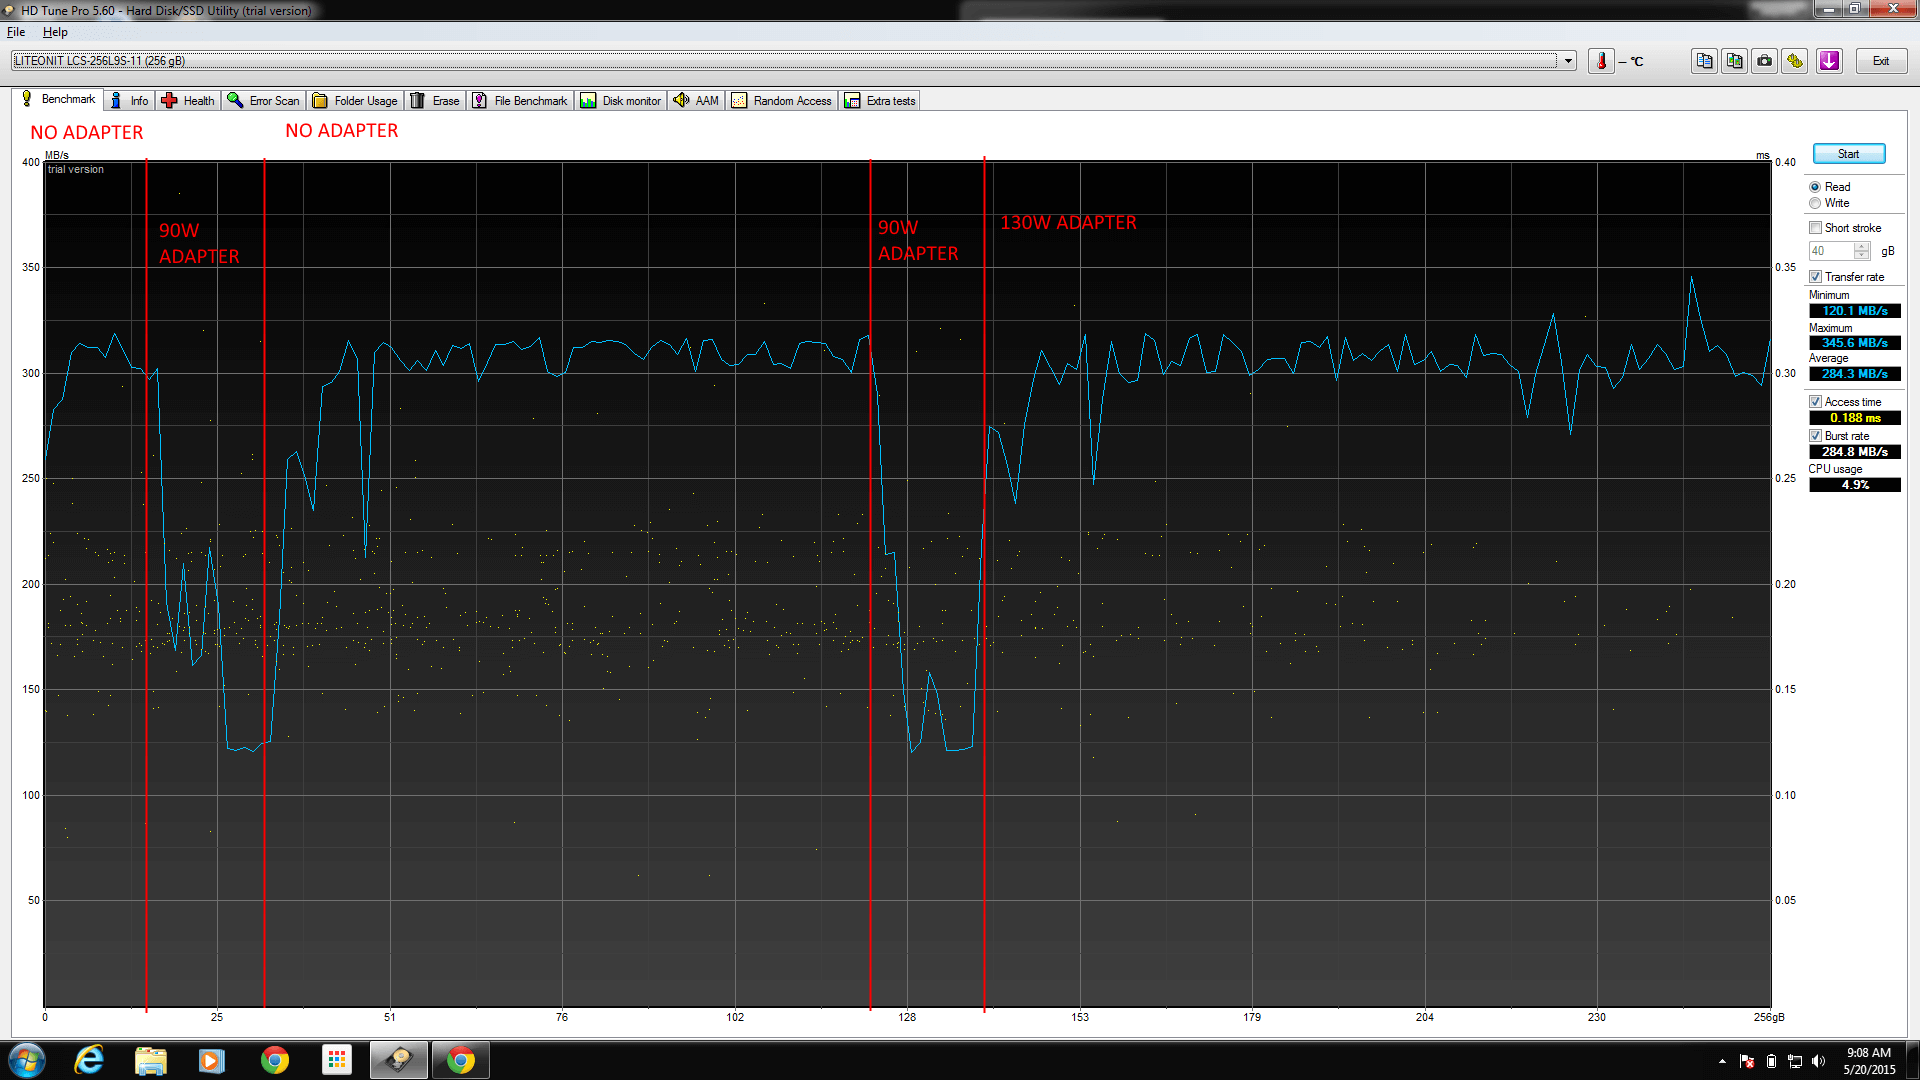
Using any AC adapter below 130W on the M2800 will result in the machine yelling at you during power up, for good reason.  It’s not powerful enough.

If you use a 65W or a 90W AC adapter, the drive (and CPU) both clock themselves down in order to get the battery to charge.

Frustrating, to say the least.  “OMG, DUH” as my coworker politely put it.

The moral of the story: Use the wattage that came with your laptop, or you might experience otherwise un-explainable performance drops.

God damn, we are the dumbest smart people I know.

Found some really encouraging food for thought (words to live by) for I.T. people (maybe everyone) that I just had to share.

From a thread about being Stuck on Windows Update 3/3 several people brought up great points.

“Whether a 1-minute call or a 30-minute call, I bill for 30 mins minimum.”

This of course prompted a curious reply: “I often wonder where to draw the line with this… if they call and I say “click file, options, disable xxx” and it fixes it with a 30 second call, should I really put in time for that?”

Which brings us to the first gem:

  1. If you don’t value your time, no one else will.which then brings us to the next gem of wisdom:
  2. Not just the time, the knowledge. Value your knowledge. If they need to call you for help, it means that you know something they don’t….and that’s worth some compensation.

So to you, readers, I remind you: your time is valuable.  Your energy is valuable.  Your knowledge is valuable.  Some of you went to school for this (and might still be paying it off).  Some of you have slaved away doing menial labor for years to get to the point where you have skills you bring to the table.

Your time is worth it.

YOU are worth it.

And if you aren’t, then why are they still asking you for help?

whos-awesome-youre-awesome buddy-awesome1 b1863ec001f174e2d9a3cc0ad89aad0cbf78ddd297256b891bd8ff4662f3f044 awesome mr. t 57060849 45753d20f945c3fbb9c1383dfd5e4c26a9c801d6493ebebc73e8f482dac1b857 014 9e3aa630-4268-41a5-ac9a-515768c34ee8

Food for thought.

Further reading, if you have the time. =)

Source: WPScan by the WPScan Team

If you’re using a WordPress site then you really should be using the WordPress Scanner WPScan.  It’s SUPER simple to install and very user friendly.

I heard about it from ma.ttias.be’s website which I’ve been following for a while now since he’s pretty spot on when it comes to IT Security and does a good deal of work with Zabbix (Mobile Zabbix UI, if you haven’t checked it out, is pretty sweet).

Returning to the original subject,  WPScan.

For me, installation was a simple series of commands (I’m running Ubuntu 14.04.2, LTS):

  1. sudo apt-get install libcurl4-openssl-dev libxml2 libxml2-dev libxslt1-dev ruby-dev build-essential
  2. git clone https://github.com/wpscanteam/wpscan.git
  3. cd wpscan
  4. sudo gem install bundler && bundle install --without test
  5. ./wpscan.rb --update
  6. ./wpscan.rb --url http(s)://yourwebsite.whoa

Running the scan on my website revealed an HTML file that tells the WordPress version (not in and of itself a vulnerability, but still why give an attacker any information right off the bat), open Registration being enabled (I don’t mind, this isn’t a vulnerability it just results in me getting a LOT of spam), and directory listing being enabled (pretty significant in my book).

All in all, the process took about 15 minutes from install to secured.

This is highly recommended in my book.

Cheers,

-M

For a long time we had been using Nagios for monitoring services and equipment in our shop.  During one of our I.T. services commission meetings a discussion about monitoring came up and a bunch of ideas were thrown around.  We talked about the advantages and disadvantages of a base Nagios installation like we were using (managing devices, templates, etc is not exactly easy since it’s a bunch of text files).  A number of names for replacements were dropped by the other I.T. managers and my boss suggested I take a look and see if any of them could do the job we needed.

Suggestions included Nagios & Cacti with Weathermap Plugin, Eyes of Network, PRTG, and Zabbix.  After looking at all the options, I found Zabbix to be the easiest to get rolling (which turned out to be wrong!) so I went with it.  I spent about a week setting up the VM and it was going great, until I added some switches and enabled SNMP Discovery for Interfaces.  Suddenly, the server slammed to a halt.   Processes were flying through the roof, the server itself was overloaded, and the housekeeper process was stuck at 100% use for over 4 hours a time, every hour.  Doing some digging on the Zabbix forums I discovered that there are a LOT of configuration tweaks that should be done in order to keep the machine happy.

To that end, I decided to write up a guide about how to get an optimal setup (it has been working SO much better for me).  I’ll also briefly touch on making Zabbix communicate with Cachet for a public landing page.

  1. Install and configure an instance of Ubuntu x64 Server edition (in this case, Ubuntu 14.04 LTS)
    1. For reference, the specifications I used were:
      1. RAM: 8 GB
      2. CPU: 4 CPUs, 2 Cores
      3. Storage: 128 GB
    2. Be sure to install SSH Server and LAMP Server during the installation process.
  2. Do updates (always a good idea as a general rule of thumb):
    sudo apt-get update && sudo apt-get upgrade
  3. Now we need to configure the SQL Server
    1. Enable innodb_file_per_table
      1. sudo nano /etc/mysql/my.cnf
      2. Under the [mysqld] heading, add the line:
        innodb_file_per_table
    2. Generic tweaks
      1. From this link we gathered the following tweaks for the my.cnf, again under the [mysqld] heading:
        1. innodb_buffer_pool_size = 4G (set this to 50% RAM if running the entire server on this box, 75% if you’re only running the database on this box).
        2. innodb_buffer_pool_instances = 4 (change to 8 or 16 on MySQL 5.6)
        3. innodb_flush_log_at_trx_commit = 0
        4. innodb_flush_method = O_DIRECT
        5. innodb_old_blocks_time = 1000
        6. innodb_io_capacity = 600 (400-800 for standard drives, >= 2000 for SSD drives)
        7. sync_binlog = 0
        8. query_cache_size = 0
        9. query_cache_type = 0
        10. event_scheduler = ENABLED
      2. Run the MySQL Tuner utility
        1. wget https://raw.githubusercontent.com/major/MySQLTuner-perl/master/mysqltuner.pl
        2. chmod +x mysqltuner.pl
        3. ./mysqltuner.pl
          1. We can ignore the query_cache_type (we set it to 0 for a reason)
          2. Ignore InnoDB is enabled but isn’t being used ( we don’t have any tables yet!)
          3. Ignore -FEDERATED (this is deprecated in MySQL > 5.5)
          4. Ignore Key buffer hit rate (since we JUST started the server)
        4. Keep in mind, this utility is best used after you’ve got some data in your tables.
  4. Get and install the Zabbix Server and Agent
    1. wget http://repo.zabbix.com/zabbix/2.4/ubuntu/pool/main/z/zabbix-release/zabbix-release_2.4-1+trusty_all.deb
    2. sudo dpkg -i zabbix-release_2.4-1+trusty_all.deb
    3. sudo apt-get update
    4. sudo apt-get install zabbix-server-mysql zabbix-frontend-php zabbix-agent
  5. Time to do the Web Installation
    1. sudo nano /etc/php5/apache2/php.ini
      1. Uncomment ;date.timezone =
      2. Set date.timezone appropriately (for me: “America/New_York”)
      3. sudo service apache2 restart
    2. Now do the web installation.  That part you can do without me guiding you through it.   🙂
    3. Test your login with admin/zabbix.
  6. Setup partitioning of the SQL instance
    1. There’s a guide for it here.
    2. mysql -u <your mysql login> -p (login appropriately)
    3. use zabbix;
    4. ALTER TABLE housekeeper ENGINE = BLACKHOLE;
    5. From the “Getting ready” section:
      1. ALTER TABLE `acknowledges` DROP PRIMARY KEY, ADD KEY `acknowledges_0` (`acknowledgeid`);
      2. ALTER TABLE `alerts` DROP PRIMARY KEY, ADD KEY `alerts_0` (`alertid`);
      3. ALTER TABLE `auditlog` DROP PRIMARY KEY, ADD KEY `auditlog_0` (`auditid`);
      4. ALTER TABLE `events` DROP PRIMARY KEY, ADD KEY `events_0` (`eventid`);
      5. ALTER TABLE `service_alarms` DROP PRIMARY KEY, ADD KEY `service_alarms_0` (`servicealarmid`);
      6. ALTER TABLE `history_log` DROP PRIMARY KEY, ADD INDEX `history_log_0` (`id`);
      7. ALTER TABLE `history_log` DROP KEY `history_log_2`;
      8. ALTER TABLE `history_text` DROP PRIMARY KEY, ADD INDEX `history_text_0` (`id`);
      9. ALTER TABLE `history_text` DROP KEY `history_text_2`;
      10. ALTER TABLE `acknowledges` DROP FOREIGN KEY `c_acknowledges_1`, DROP FOREIGN KEY `c_acknowledges_2`;
      11. ALTER TABLE `alerts` DROP FOREIGN KEY `c_alerts_1`, DROP FOREIGN KEY `c_alerts_2`, DROP FOREIGN KEY `c_alerts_3`, DROP FOREIGN KEY `c_alerts_4`;
      12. ALTER TABLE `auditlog` DROP FOREIGN KEY `c_auditlog_1`;
      13. ALTER TABLE `service_alarms` DROP FOREIGN KEY `c_service_alarms_1`;
      14. ALTER TABLE `auditlog_details` DROP FOREIGN KEY `c_auditlog_details_1`;
    6. Create the managing partition table:
      1. CREATE TABLE `manage_partitions` (
        `tablename` VARCHAR(64) NOT NULL COMMENT ‘Table name’,
        `period` VARCHAR(64) NOT NULL COMMENT ‘Period – daily or monthly’,
        `keep_history` INT(3) UNSIGNED NOT NULL DEFAULT ‘1’ COMMENT ‘For how many days or months to keep the partitions’,
        `last_updated` DATETIME DEFAULT NULL COMMENT ‘When a partition was added last time’,
        `comments` VARCHAR(128) DEFAULT ‘1’ COMMENT ‘Comments’,
        PRIMARY KEY (`tablename`)
        ) ENGINE=INNODB;
    7. Create the maintenance procedures
      1. Guide here, we need the “Stored Procedures”.
        1. DELIMITER $$
          CREATE PROCEDURE `partition_create`(SCHEMANAME VARCHAR(64), TABLENAME VARCHAR(64), PARTITIONNAME VARCHAR(64), CLOCK INT)
          BEGIN
                  /*
                     SCHEMANAME = The DB schema in which to make changes
                     TABLENAME = The table with partitions to potentially delete
                     PARTITIONNAME = The name of the partition to create
                  */
                  /*
                     Verify that the partition does not already exist
                  */
           
                  DECLARE RETROWS INT;
                  SELECT COUNT(1) INTO RETROWS
                  FROM information_schema.partitions
                  WHERE table_schema = SCHEMANAME AND TABLE_NAME = TABLENAME AND partition_description >= CLOCK;
           
                  IF RETROWS = 0 THEN
                          /*
                             1. Print a message indicating that a partition was created.
                             2. Create the SQL to create the partition.
                             3. Execute the SQL from #2.
                          */
                          SELECT CONCAT( "partition_create(", SCHEMANAME, ",", TABLENAME, ",", PARTITIONNAME, ",", CLOCK, ")" ) AS msg;
                          SET @SQL = CONCAT( 'ALTER TABLE ', SCHEMANAME, '.', TABLENAME, ' ADD PARTITION (PARTITION ', PARTITIONNAME, ' VALUES LESS THAN (', CLOCK, '));' );
                          PREPARE STMT FROM @SQL;
                          EXECUTE STMT;
                          DEALLOCATE PREPARE STMT;
                  END IF;
          END$$
          DELIMITER ;
        2. DELIMITER $$
          CREATE PROCEDURE `partition_drop`(SCHEMANAME VARCHAR(64), TABLENAME VARCHAR(64), DELETE_BELOW_PARTITION_DATE BIGINT)
          BEGIN
                  /*
                     SCHEMANAME = The DB schema in which to make changes
                     TABLENAME = The table with partitions to potentially delete
                     DELETE_BELOW_PARTITION_DATE = Delete any partitions with names that are dates older than this one (yyyy-mm-dd)
                  */
                  DECLARE done INT DEFAULT FALSE;
                  DECLARE drop_part_name VARCHAR(16);
           
                  /*
                     Get a list of all the partitions that are older than the date
                     in DELETE_BELOW_PARTITION_DATE.  All partitions are prefixed with
                     a "p", so use SUBSTRING TO get rid of that character.
                  */
                  DECLARE myCursor CURSOR FOR
                          SELECT partition_name
                          FROM information_schema.partitions
                          WHERE table_schema = SCHEMANAME AND TABLE_NAME = TABLENAME AND CAST(SUBSTRING(partition_name FROM 2) AS UNSIGNED) < DELETE_BELOW_PARTITION_DATE;
                  DECLARE CONTINUE HANDLER FOR NOT FOUND SET done = TRUE;
           
                  /*
                     Create the basics for when we need to drop the partition.  Also, create
                     @drop_partitions to hold a comma-delimited list of all partitions that
                     should be deleted.
                  */
                  SET @alter_header = CONCAT("ALTER TABLE ", SCHEMANAME, ".", TABLENAME, " DROP PARTITION ");
                  SET @drop_partitions = "";
           
                  /*
                     Start looping through all the partitions that are too old.
                  */
                  OPEN myCursor;
                  read_loop: LOOP
                          FETCH myCursor INTO drop_part_name;
                          IF done THEN
                                  LEAVE read_loop;
                          END IF;
                          SET @drop_partitions = IF(@drop_partitions = "", drop_part_name, CONCAT(@drop_partitions, ",", drop_part_name));
                  END LOOP;
                  IF @drop_partitions != "" THEN
                          /*
                             1. Build the SQL to drop all the necessary partitions.
                             2. Run the SQL to drop the partitions.
                             3. Print out the table partitions that were deleted.
                          */
                          SET @full_sql = CONCAT(@alter_header, @drop_partitions, ";");
                          PREPARE STMT FROM @full_sql;
                          EXECUTE STMT;
                          DEALLOCATE PREPARE STMT;
           
                          SELECT CONCAT(SCHEMANAME, ".", TABLENAME) AS `table`, @drop_partitions AS `partitions_deleted`;
                  ELSE
                          /*
                             No partitions are being deleted, so print out "N/A" (Not applicable) to indicate
                             that no changes were made.
                          */
                          SELECT CONCAT(SCHEMANAME, ".", TABLENAME) AS `table`, "N/A" AS `partitions_deleted`;
                  END IF;
          END$$
          DELIMITER ;
        3. DELIMITER $$
          CREATE PROCEDURE `partition_maintenance`(SCHEMA_NAME VARCHAR(32), TABLE_NAME VARCHAR(32), KEEP_DATA_DAYS INT, HOURLY_INTERVAL INT, CREATE_NEXT_INTERVALS INT)
          BEGIN
                  DECLARE OLDER_THAN_PARTITION_DATE VARCHAR(16);
                  DECLARE PARTITION_NAME VARCHAR(16);
                  DECLARE LESS_THAN_TIMESTAMP INT;
                  DECLARE CUR_TIME INT;
           
                  CALL partition_verify(SCHEMA_NAME, TABLE_NAME, HOURLY_INTERVAL);
                  SET CUR_TIME = UNIX_TIMESTAMP(DATE_FORMAT(NOW(), '%Y-%m-%d 00:00:00'));
           
                  SET @__interval = 1;
                  create_loop: LOOP
                          IF @__interval > CREATE_NEXT_INTERVALS THEN
                                  LEAVE create_loop;
                          END IF;
           
                          SET LESS_THAN_TIMESTAMP = CUR_TIME + (HOURLY_INTERVAL * @__interval * 3600);
                          SET PARTITION_NAME = FROM_UNIXTIME(CUR_TIME + HOURLY_INTERVAL * (@__interval - 1) * 3600, 'p%Y%m%d%H00');
                          CALL partition_create(SCHEMA_NAME, TABLE_NAME, PARTITION_NAME, LESS_THAN_TIMESTAMP);
                          SET @__interval=@__interval+1;
                  END LOOP;
           
                  SET OLDER_THAN_PARTITION_DATE=DATE_FORMAT(DATE_SUB(NOW(), INTERVAL KEEP_DATA_DAYS DAY), '%Y%m%d0000');
                  CALL partition_drop(SCHEMA_NAME, TABLE_NAME, OLDER_THAN_PARTITION_DATE);
           
          END$$
          DELIMITER ;
        4. DELIMITER $$
          CREATE PROCEDURE `partition_verify`(SCHEMANAME VARCHAR(64), TABLENAME VARCHAR(64), HOURLYINTERVAL INT(11))
          BEGIN
                  DECLARE PARTITION_NAME VARCHAR(16);
                  DECLARE RETROWS INT(11);
                  DECLARE FUTURE_TIMESTAMP TIMESTAMP;
           
                  /*
                   * Check if any partitions exist for the given SCHEMANAME.TABLENAME.
                   */
                  SELECT COUNT(1) INTO RETROWS
                  FROM information_schema.partitions
                  WHERE table_schema = SCHEMANAME AND TABLE_NAME = TABLENAME AND partition_name IS NULL;
           
                  /*
                   * If partitions do not exist, go ahead and partition the table
                   */
                  IF RETROWS = 1 THEN
                          /*
                           * Take the current date at 00:00:00 and add HOURLYINTERVAL to it.  This is the timestamp below which we will store values.
                           * We begin partitioning based on the beginning of a day.  This is because we don't want to generate a random partition
                           * that won't necessarily fall in line with the desired partition naming (ie: if the hour interval is 24 hours, we could
                           * end up creating a partition now named "p201403270600" when all other partitions will be like "p201403280000").
                           */
                          SET FUTURE_TIMESTAMP = TIMESTAMPADD(HOUR, HOURLYINTERVAL, CONCAT(CURDATE(), " ", '00:00:00'));
                          SET PARTITION_NAME = DATE_FORMAT(CURDATE(), 'p%Y%m%d%H00');
           
                          -- Create the partitioning query
                          SET @__PARTITION_SQL = CONCAT("ALTER TABLE ", SCHEMANAME, ".", TABLENAME, " PARTITION BY RANGE(`clock`)");
                          SET @__PARTITION_SQL = CONCAT(@__PARTITION_SQL, "(PARTITION ", PARTITION_NAME, " VALUES LESS THAN (", UNIX_TIMESTAMP(FUTURE_TIMESTAMP), "));");
           
                          -- Run the partitioning query
                          PREPARE STMT FROM @__PARTITION_SQL;
                          EXECUTE STMT;
                          DEALLOCATE PREPARE STMT;
                  END IF;
          END$$
          DELIMITER ;
        5. DELIMITER $$
          CREATE PROCEDURE `partition_maintenance_all`(SCHEMA_NAME VARCHAR(32))
          BEGIN
                          CALL partition_maintenance(SCHEMA_NAME, 'history', 28, 24, 14);
                          CALL partition_maintenance(SCHEMA_NAME, 'history_log', 28, 24, 14);
                          CALL partition_maintenance(SCHEMA_NAME, 'history_str', 28, 24, 14);
                          CALL partition_maintenance(SCHEMA_NAME, 'history_text', 28, 24, 14);
                          CALL partition_maintenance(SCHEMA_NAME, 'history_uint', 28, 24, 14);
                          CALL partition_maintenance(SCHEMA_NAME, 'trends', 730, 24, 14);
                          CALL partition_maintenance(SCHEMA_NAME, 'trends_uint', 730, 24, 14);
          END$$
          DELIMITER ;
    8. Create the new timing event
      1. DELIMITER $$
        CREATE EVENT IF NOT EXISTS `zabbix-maint`
        ON SCHEDULE EVERY 7 DAY
        STARTS ‘2015-04-29 01:00:00’
        ON COMPLETION PRESERVE
        ENABLE
        COMMENT ‘Creating and dropping partitions’
        DO BEGIN
        CALL partition_maintenance_all(‘zabbix’);
        END$$
        DELIMITER ;
      2. This will run the partition maintenance procedure on all tables in Zabbix every 7 days (creating 14 days of future partitions as well)
  7. Tweak the Zabbix instance
    1. Disable Housekeeping in Config -> General -> Housekeeping
    2. Install snmp utilities
      1. sudo apt-get install snmp snmp-mibs-downloader
    3. Tweak the Zabbix config files
      1. sudo nano /etc/zabbix/zabbix_server.conf
        1. Fix number of pingers: option StartPingers = 20 (we have 350 hosts currently, with 20 pingers, this yields ~10.52% utilization of the Pingers)
        2. Fix number of db syncers: option StartDBSyncers = 4
        3. Enable SNMP Checks: StartSNMPTrapper = 1
        4. Increase CacheSizes
          1. CacheSize = 1G
          2. HistoryCacheSize = 256M
          3. TrendCacheSize = 256M
          4. HistoryTextCacheSize = 128M
          5. ValueCacheSize = 256M
        5. Prepare the server for maximum cache size increase
          1. sudo nano /etc/sysctl.conf
          2. Add: kernel.shmmax = 1342177280
    4. Optional: Enable ldap
      1. sudo apt-get install php5-ldap
      2. sudo service apache2 restart
  8. Getting Zabbix to throw data to Cachet
    1. Create a file “notifyCachet” in /usr/lib/zabbix/alertscripts
      1. #!/bin/bash
        to=$1
        compID=$2
        statusID=$3#Comment this next line out for Production environments
        #echo “curl -H ‘Content-Type: application/json’ -H ‘X-Cachet-Token: <your cachet API token>’ http://<cachet server ip>/api/components/$compID -d ‘{“status”:$statusID}’ -X PUT”#Uncomment this next line for Production
        curl -H ‘Content-Type: application/json’ -H ‘X-Cachet-Token: <your cachet API token>’ http://<cachet server ip>/api/components/”$compID” -d “{‘status’:$statusID}” -X PUT
    2. From Zabbix: go to Admin -> Media Types -> Create Media Type
      1. Set Name to whatever
      2. Type is Script
      3. Script Name is “notifyCachet”
    3. Go to Config -> Actions -> Create Action
      1. Action Settings:
        1. Default/Recovery Subject: {$CACHET}
        2. Default Message: 4 (A major outage)
        3. Recovery Message: 1 (Operational)
      2. Conditions: Add Trigger Severity >= Average
      3. Operations: Add a User Group, Send ONLY to Cachet_Notify (from Section 8, Subsection 2, Section 1)
    4. In all Hosts for Cachet, you MUST set a Macro {$CACHET} where the value is the Cachet ID Number

I know, this is a lot of stuff to process, but honestly it’s worth going through and setting it up properly.  Zabbix is running flawlessly for us right now.  This is a bit messy right now (yay wordpress) so in a day or so here’s a PDF version of the guide.

Cheers,

-M