So, we’ve now got a working prototype built. It does the following bits:
- Allows us to remotely trigger the door lock mechanism from a smartphone.
- Sends us notification alerts via Push to our smartphone.
Bits still pending:
- Smartphone to wall box communication (via panel Mic wire).
- Wall box to smartphone communication (via panel Speaker wire).
After doing some research on how to best accomplish a bunch of these tasks I stumbled upon an awesome library that is taking care of a lot of the heavy lifting for me: Blynk.
Basically, the Blynk library gets pushed onto your Arduino and uses a wide variety of hardware to communicate. We are currently using a HanRun HR911150A which works as an Ethernet Shield W5100, thankfully. You import the library as part of your sketch, upload it to the Arduino (after adding your API Key), and it allows your Arduino to talk to your smartphone, Android or iPhone. It doesn’t care.
Here’s the code we have so far:
#define BLYNK_PRINT Serial

#include <SPI.h>
#include <Ethernet.h>
#include <BlynkSimpleEthernet.h>

char auth[] = "yourapikeyhere";

#define W5100_CS 10
#define SDCARD_CS 4

// My stuff
int buzzerPin = 0; // Pin A0 on Uno
int curVal = 0;
int lastVal = 0;
float threshhold = 450;


void setup(){
    Serial.begin(9600);
    pinMode(buzzerPin,INPUT);
    Blynk.begin(auth);
}

void loop(){
    Blynk.run();
    curVal = analogRead(buzzerPin);
    if(curVal>=threshhold){
        if(lastVal<threshhold){
            Blynk.notify("Hey! Someone buzzed the door of the apartment!");
        }
     }
     lastVal = curVal;
}
That’s all there is to it. The rest is done in the app itself, as per the screenshot:
-
- Edit App Screen
-
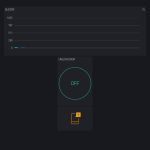
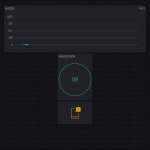
- Active App Screen
-
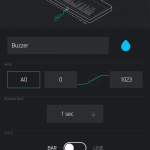
- Setup for the buzzer graph
-
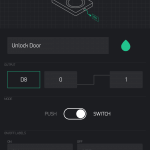
- Setup for the door trigger button
-
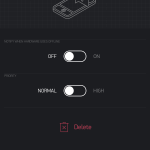
- Push Notification setup
It’s a very simple app but it works perfectly. If pin A0 detects voltage > 450 (notice this is different from the alpha revision) it triggers a push notification. The push notification opens the app and presents you with a button. Push the button and the door unlocks until you push the button again.
Pure simplicity.
I don’t know why my voltage divider is providing different data values here, nor why the code that worked previously in the alpha revision didn’t work in this revision, but here are my guesses:
- The voltage calculation didn’t work, most likely, because I was using some sort of variable names that the Blynk library was using, thus causing conflicts.
- The Blynk library wasn’t happy in and of itself with the calculations (I was getting a lot of infs and nans).
- The voltage divider acts differently because of the Ethernet shield in the way, introducing a different resistance on the pins which interferes with the calculations.
This is all conjecture, I don’t have proof yet, but it’s something to work on before I make a final build on a true board.
Regardless, this whole project is really cool and I’m so glad it works.
-M, out.
I’m really excited to see what you do with this. I’m most interested in how you integrate 2-way voice communication. Keep up the good work!
That’s the next step to work on Rob. I’m not sure how I’m going to get the Arduino to handle interfacing with the sound, but it’s an ongoing project. I just posted step 4, putting the board on to a prototype board here.