Brought to you by the “I hate Mondays” department of Tales Of A Tech.
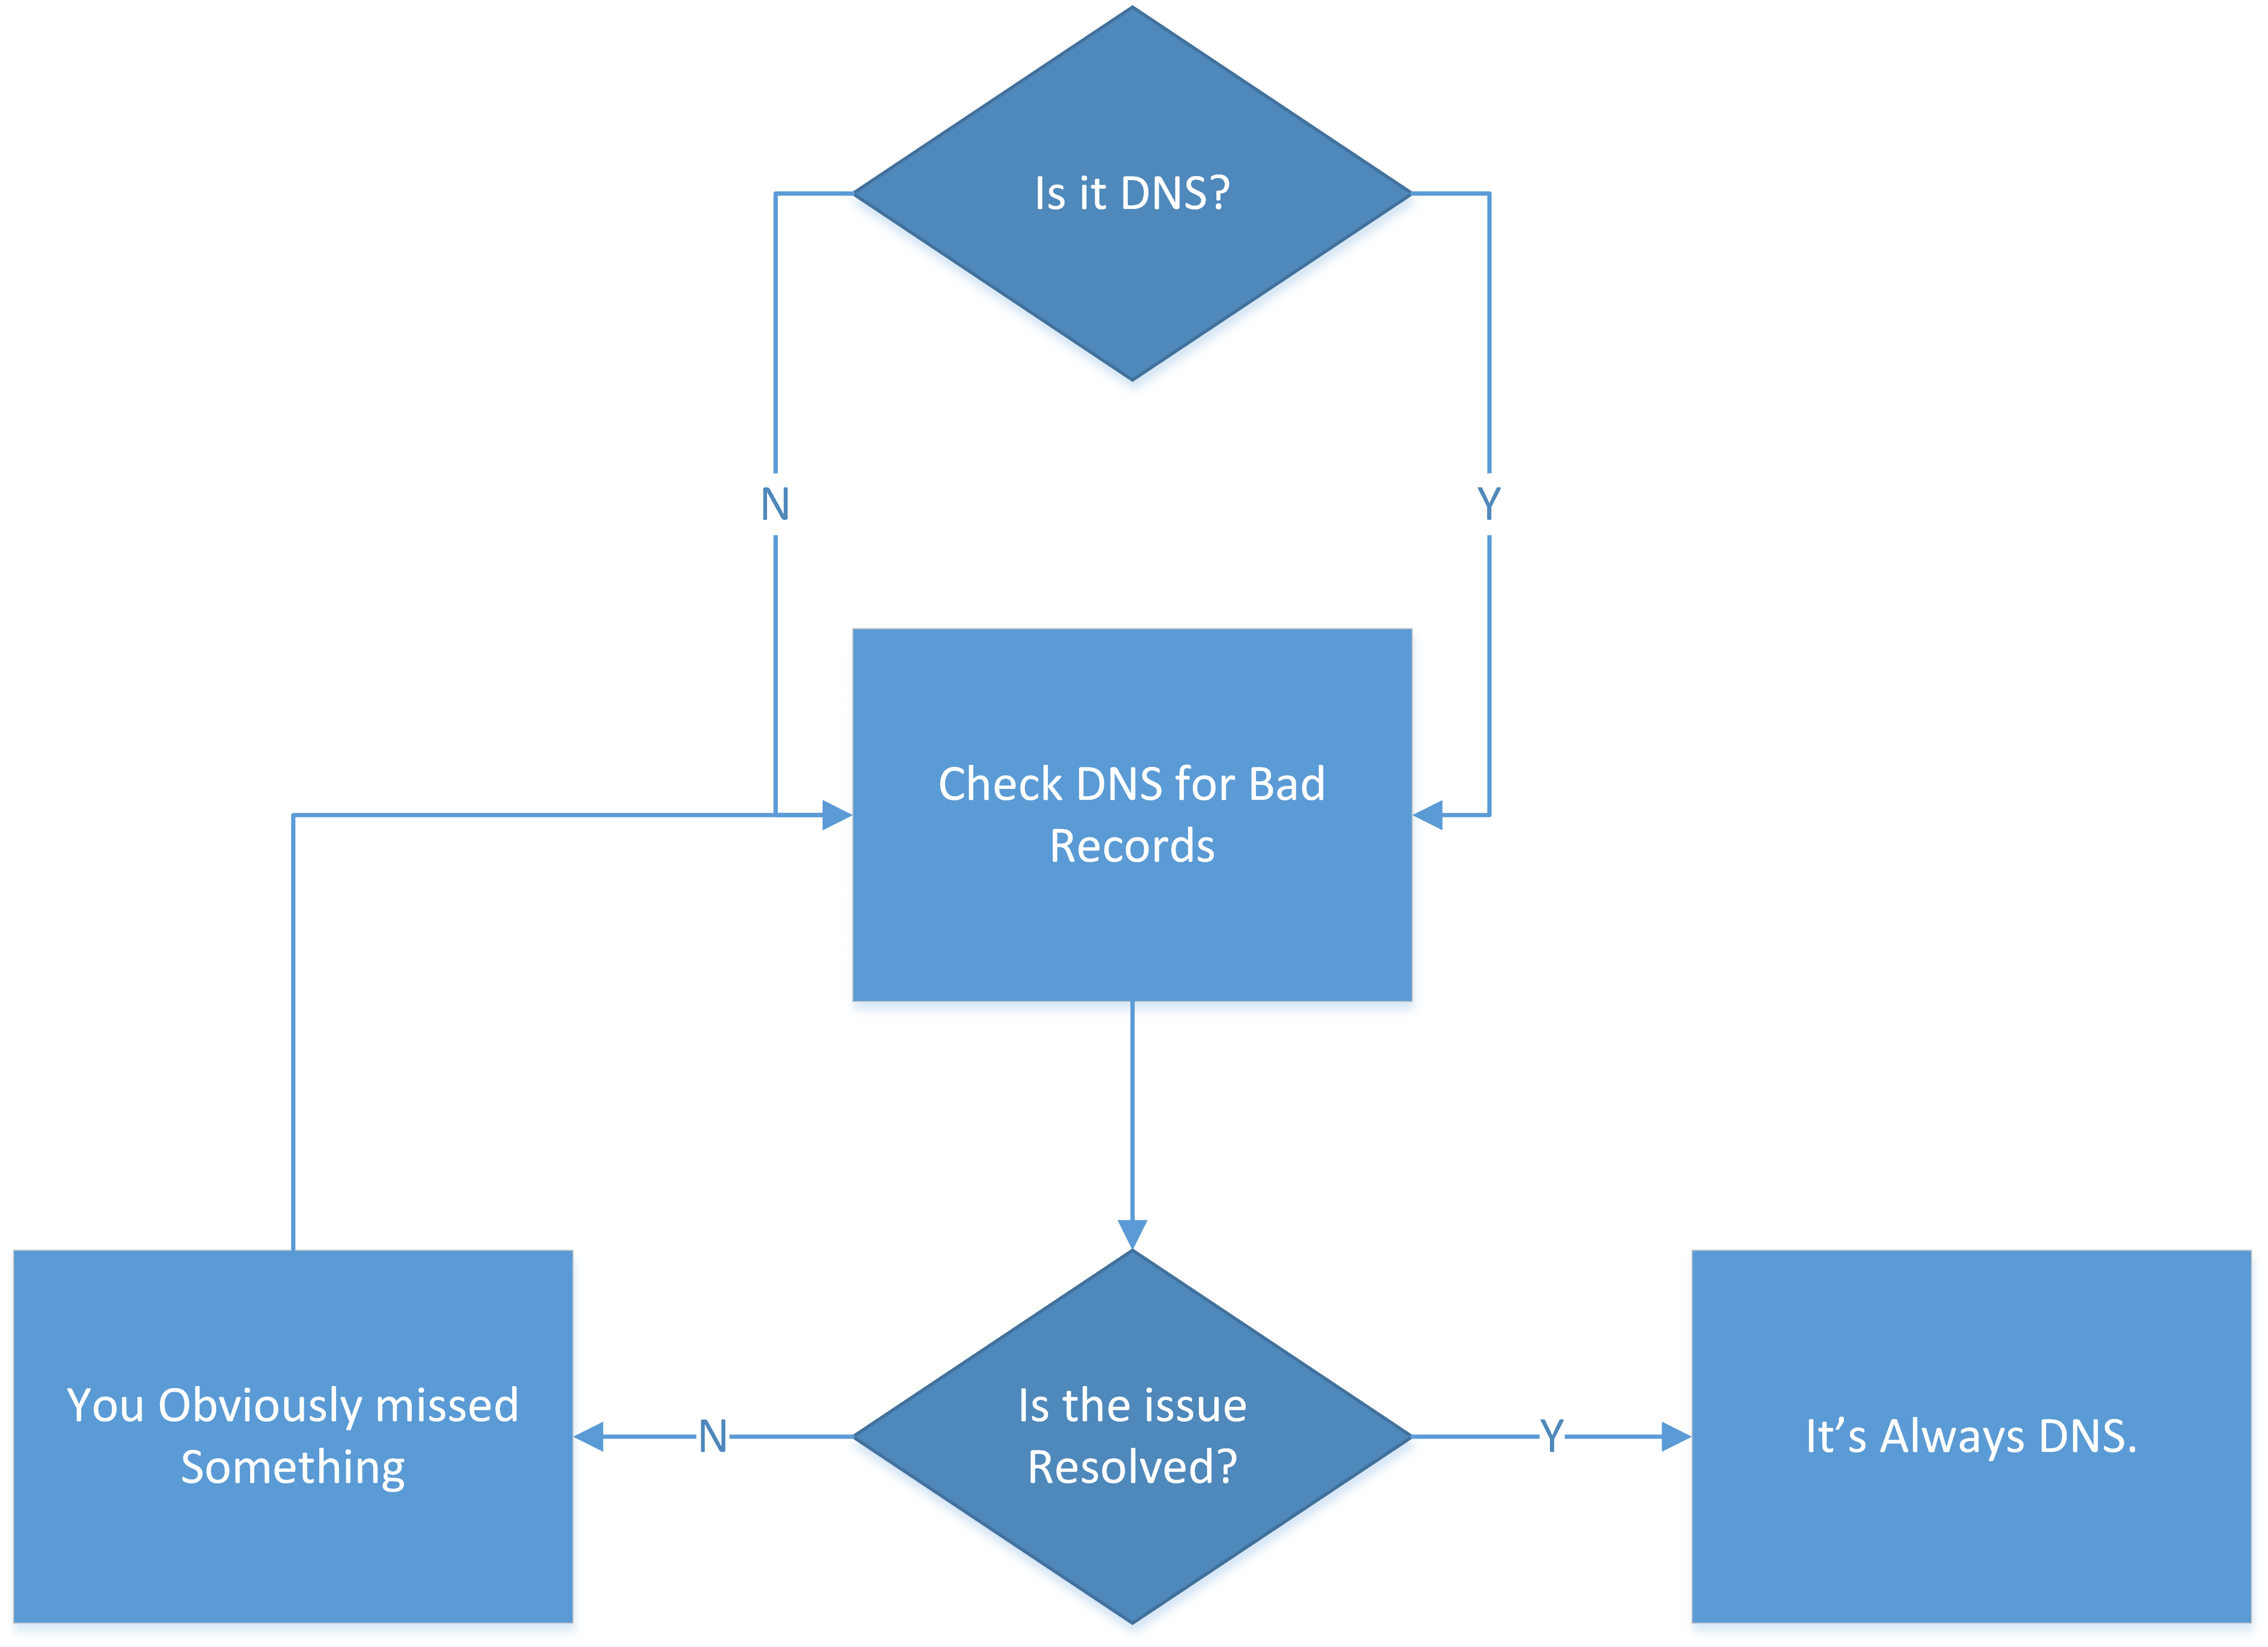
We would like to remind you that if there is a problem and you can’t seem to figure it out there’s always one solution to look to: It’s ALWAYS DNS.
Brought to you by the “I hate Mondays” department of Tales Of A Tech.
We would like to remind you that if there is a problem and you can’t seem to figure it out there’s always one solution to look to: It’s ALWAYS DNS.
Fun times at the district last week. A broken cable lead to a frantic search for the oddest of cables: USB to RJ45-Console-Sort-Of-Not-Really.
Here’s what we’re dealing with (a good cable):
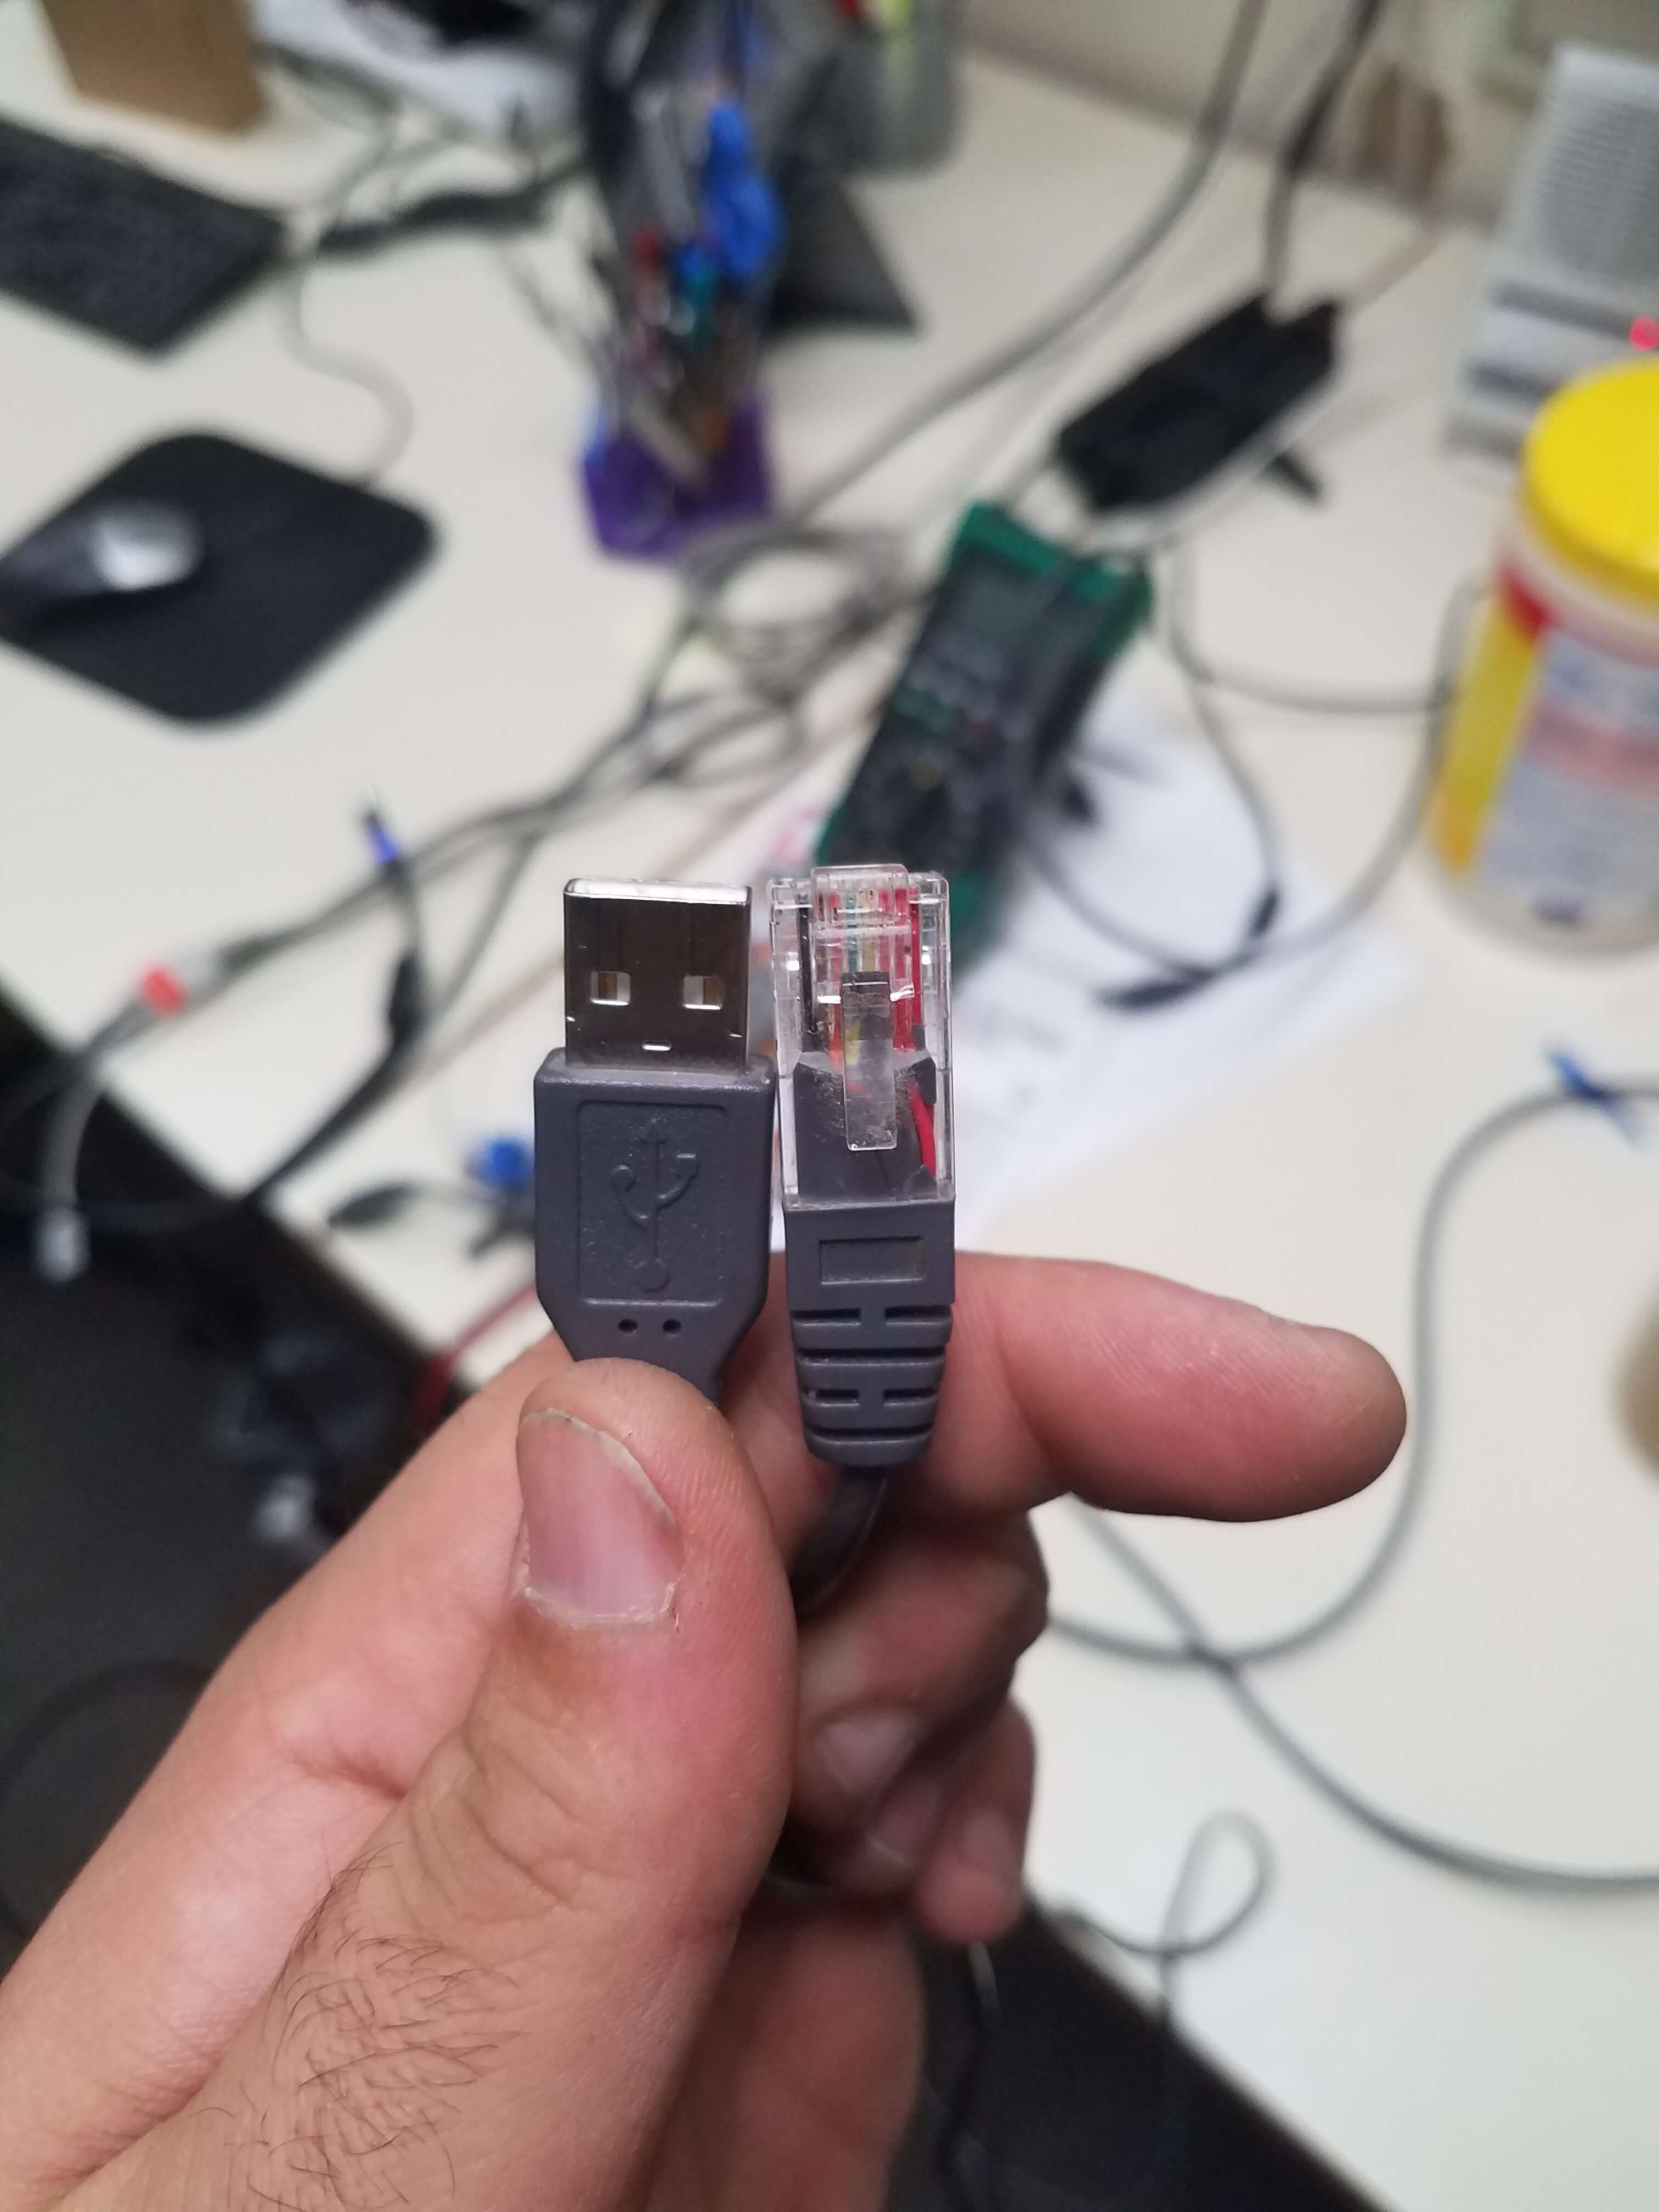
Sorry for the weird angle, I wasn’t thinking when I took it.

Fire Alarm and Security Alarm panels are great devices. Their central brain system allows a bunch of independent systems (smoke detectors, CO2 detectors, heat detectors, gas detectors, door open detectors, etc) to all report back to a central location and then have the central location call out to the Police or Fire Department and relay exactly what is wrong at exactly what part of the building.
In theory this is great.
The only problem is: how do these devices communicate with the outside world (the inside world being your building, the outside world being everyone else). The answer for us is: a phone line.

It works! It really works! I’ve finally implemented something that works!
A few weeks ago I wrote up a post about my experiments with Domains and homelab and WDS. I’m pleased to report today that it worked! It worked perfectly.
My poor desktop chokes when running the three VMs (DC, WDSS, and Deployed Desktop) but it works (though this may be changing since Nick and I decided to invest in a Homelab setup for the apartment; a Dell R710 with 2 Xeon E5645 Processors, 72GB RAM, and 4TB storage). The Deployed Desktop boots off PXE from WDSS via DHCP from the DC, and boom. Boots into WDS and receives and image. No interaction required (unless I require it). A lot of this is going to be a link repository for my own use.
It was super thrilling to get the thing working. There are a bunch of caveats and I’m going to try and outline them here.
So, we’re getting ready to deploy Windows 10 next year by preparing for it this year.
Well, everything sucks and is miserable while trying to do it with Altiris Deployment Services and Ghost, so I took it upon myself to work on alternatives. WDS here we come.
This is the start of the project, and it starts with testing it in the Homelab. Well, the first part of getting the whole process started is: setting up the Homelab, which I’ve never done before.
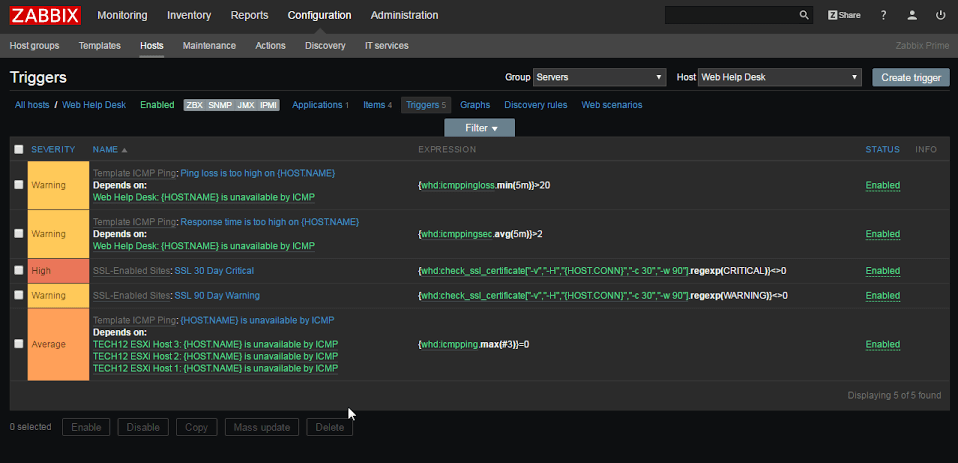
I’ve been talking a lot about Zabbix lately (mostly because it’s a lot of what is on my plate at work) and I keep finding little gotcha points that I understand but are very frustrating. Last week (and into this week) I’ve been setting up trigger dependency. Here’s an example, just as a hypothetical situation.
Found some really encouraging food for thought (words to live by) for I.T. people (maybe everyone) that I just had to share.
From a thread about being Stuck on Windows Update 3/3 several people brought up great points.
“Whether a 1-minute call or a 30-minute call, I bill for 30 mins minimum.”
This of course prompted a curious reply: “I often wonder where to draw the line with this… if they call and I say “click file, options, disable xxx” and it fixes it with a 30 second call, should I really put in time for that?”
Which brings us to the first gem:
So to you, readers, I remind you: your time is valuable. Your energy is valuable. Your knowledge is valuable. Some of you went to school for this (and might still be paying it off). Some of you have slaved away doing menial labor for years to get to the point where you have skills you bring to the table.
Your time is worth it.
YOU are worth it.
And if you aren’t, then why are they still asking you for help?


Food for thought.
Further reading, if you have the time. =)
For a long time we had been using Nagios for monitoring services and equipment in our shop. During one of our I.T. services commission meetings a discussion about monitoring came up and a bunch of ideas were thrown around. We talked about the advantages and disadvantages of a base Nagios installation like we were using (managing devices, templates, etc is not exactly easy since it’s a bunch of text files). A number of names for replacements were dropped by the other I.T. managers and my boss suggested I take a look and see if any of them could do the job we needed.
Suggestions included Nagios & Cacti with Weathermap Plugin, Eyes of Network, PRTG, and Zabbix. After looking at all the options, I found Zabbix to be the easiest to get rolling (which turned out to be wrong!) so I went with it. I spent about a week setting up the VM and it was going great, until I added some switches and enabled SNMP Discovery for Interfaces. Suddenly, the server slammed to a halt. Processes were flying through the roof, the server itself was overloaded, and the housekeeper process was stuck at 100% use for over 4 hours a time, every hour. Doing some digging on the Zabbix forums I discovered that there are a LOT of configuration tweaks that should be done in order to keep the machine happy.
To that end, I decided to write up a guide about how to get an optimal setup (it has been working SO much better for me). I’ll also briefly touch on making Zabbix communicate with Cachet for a public landing page.
DELIMITER $$
CREATE PROCEDURE `partition_create`(SCHEMANAME VARCHAR(64), TABLENAME VARCHAR(64), PARTITIONNAME VARCHAR(64), CLOCK INT)
BEGIN
        /*
           SCHEMANAME = The DB schema in which to make changes
           TABLENAME = The table with partitions to potentially delete
           PARTITIONNAME = The name of the partition to create
        */
        /*
           Verify that the partition does not already exist
        */

        DECLARE RETROWS INT;
        SELECT COUNT(1) INTO RETROWS
        FROM information_schema.partitions
        WHERE table_schema = SCHEMANAME AND TABLE_NAME = TABLENAME AND partition_description >= CLOCK;

        IF RETROWS = 0 THEN
                /*
                   1. Print a message indicating that a partition was created.
                   2. Create the SQL to create the partition.
                   3. Execute the SQL from #2.
                */
                SELECT CONCAT( "partition_create(", SCHEMANAME, ",", TABLENAME, ",", PARTITIONNAME, ",", CLOCK, ")" ) AS msg;
                SET @SQL = CONCAT( 'ALTER TABLE ', SCHEMANAME, '.', TABLENAME, ' ADD PARTITION (PARTITION ', PARTITIONNAME, ' VALUES LESS THAN (', CLOCK, '));' );
                PREPARE STMT FROM @SQL;
                EXECUTE STMT;
                DEALLOCATE PREPARE STMT;
        END IF;
END$$
DELIMITER ;
DELIMITER $$
CREATE PROCEDURE `partition_drop`(SCHEMANAME VARCHAR(64), TABLENAME VARCHAR(64), DELETE_BELOW_PARTITION_DATE BIGINT)
BEGIN
        /*
           SCHEMANAME = The DB schema in which to make changes
           TABLENAME = The table with partitions to potentially delete
           DELETE_BELOW_PARTITION_DATE = Delete any partitions with names that are dates older than this one (yyyy-mm-dd)
        */
        DECLARE done INT DEFAULT FALSE;
        DECLARE drop_part_name VARCHAR(16);

        /*
           Get a list of all the partitions that are older than the date
           in DELETE_BELOW_PARTITION_DATE.  All partitions are prefixed with
           a "p", so use SUBSTRING TO get rid of that character.
        */
        DECLARE myCursor CURSOR FOR
                SELECT partition_name
                FROM information_schema.partitions
                WHERE table_schema = SCHEMANAME AND TABLE_NAME = TABLENAME AND CAST(SUBSTRING(partition_name FROM 2) AS UNSIGNED) < DELETE_BELOW_PARTITION_DATE;
        DECLARE CONTINUE HANDLER FOR NOT FOUND SET done = TRUE;

        /*
           Create the basics for when we need to drop the partition.  Also, create
           @drop_partitions to hold a comma-delimited list of all partitions that
           should be deleted.
        */
        SET @alter_header = CONCAT("ALTER TABLE ", SCHEMANAME, ".", TABLENAME, " DROP PARTITION ");
        SET @drop_partitions = "";

        /*
           Start looping through all the partitions that are too old.
        */
        OPEN myCursor;
        read_loop: LOOP
                FETCH myCursor INTO drop_part_name;
                IF done THEN
                        LEAVE read_loop;
                END IF;
                SET @drop_partitions = IF(@drop_partitions = "", drop_part_name, CONCAT(@drop_partitions, ",", drop_part_name));
        END LOOP;
        IF @drop_partitions != "" THEN
                /*
                   1. Build the SQL to drop all the necessary partitions.
                   2. Run the SQL to drop the partitions.
                   3. Print out the table partitions that were deleted.
                */
                SET @full_sql = CONCAT(@alter_header, @drop_partitions, ";");
                PREPARE STMT FROM @full_sql;
                EXECUTE STMT;
                DEALLOCATE PREPARE STMT;

                SELECT CONCAT(SCHEMANAME, ".", TABLENAME) AS `table`, @drop_partitions AS `partitions_deleted`;
        ELSE
                /*
                   No partitions are being deleted, so print out "N/A" (Not applicable) to indicate
                   that no changes were made.
                */
                SELECT CONCAT(SCHEMANAME, ".", TABLENAME) AS `table`, "N/A" AS `partitions_deleted`;
        END IF;
END$$
DELIMITER ;
DELIMITER $$
CREATE PROCEDURE `partition_maintenance`(SCHEMA_NAME VARCHAR(32), TABLE_NAME VARCHAR(32), KEEP_DATA_DAYS INT, HOURLY_INTERVAL INT, CREATE_NEXT_INTERVALS INT)
BEGIN
        DECLARE OLDER_THAN_PARTITION_DATE VARCHAR(16);
        DECLARE PARTITION_NAME VARCHAR(16);
        DECLARE LESS_THAN_TIMESTAMP INT;
        DECLARE CUR_TIME INT;

        CALL partition_verify(SCHEMA_NAME, TABLE_NAME, HOURLY_INTERVAL);
        SET CUR_TIME = UNIX_TIMESTAMP(DATE_FORMAT(NOW(), '%Y-%m-%d 00:00:00'));

        SET @__interval = 1;
        create_loop: LOOP
                IF @__interval > CREATE_NEXT_INTERVALS THEN
                        LEAVE create_loop;
                END IF;

                SET LESS_THAN_TIMESTAMP = CUR_TIME + (HOURLY_INTERVAL * @__interval * 3600);
                SET PARTITION_NAME = FROM_UNIXTIME(CUR_TIME + HOURLY_INTERVAL * (@__interval - 1) * 3600, 'p%Y%m%d%H00');
                CALL partition_create(SCHEMA_NAME, TABLE_NAME, PARTITION_NAME, LESS_THAN_TIMESTAMP);
                SET @__interval=@__interval+1;
        END LOOP;

        SET OLDER_THAN_PARTITION_DATE=DATE_FORMAT(DATE_SUB(NOW(), INTERVAL KEEP_DATA_DAYS DAY), '%Y%m%d0000');
        CALL partition_drop(SCHEMA_NAME, TABLE_NAME, OLDER_THAN_PARTITION_DATE);

END$$
DELIMITER ;
DELIMITER $$
CREATE PROCEDURE `partition_verify`(SCHEMANAME VARCHAR(64), TABLENAME VARCHAR(64), HOURLYINTERVAL INT(11))
BEGIN
        DECLARE PARTITION_NAME VARCHAR(16);
        DECLARE RETROWS INT(11);
        DECLARE FUTURE_TIMESTAMP TIMESTAMP;

        /*
         * Check if any partitions exist for the given SCHEMANAME.TABLENAME.
         */
        SELECT COUNT(1) INTO RETROWS
        FROM information_schema.partitions
        WHERE table_schema = SCHEMANAME AND TABLE_NAME = TABLENAME AND partition_name IS NULL;

        /*
         * If partitions do not exist, go ahead and partition the table
         */
        IF RETROWS = 1 THEN
                /*
                 * Take the current date at 00:00:00 and add HOURLYINTERVAL to it.  This is the timestamp below which we will store values.
                 * We begin partitioning based on the beginning of a day.  This is because we don't want to generate a random partition
                 * that won't necessarily fall in line with the desired partition naming (ie: if the hour interval is 24 hours, we could
                 * end up creating a partition now named "p201403270600" when all other partitions will be like "p201403280000").
                 */
                SET FUTURE_TIMESTAMP = TIMESTAMPADD(HOUR, HOURLYINTERVAL, CONCAT(CURDATE(), " ", '00:00:00'));
                SET PARTITION_NAME = DATE_FORMAT(CURDATE(), 'p%Y%m%d%H00');

                -- Create the partitioning query
                SET @__PARTITION_SQL = CONCAT("ALTER TABLE ", SCHEMANAME, ".", TABLENAME, " PARTITION BY RANGE(`clock`)");
                SET @__PARTITION_SQL = CONCAT(@__PARTITION_SQL, "(PARTITION ", PARTITION_NAME, " VALUES LESS THAN (", UNIX_TIMESTAMP(FUTURE_TIMESTAMP), "));");

                -- Run the partitioning query
                PREPARE STMT FROM @__PARTITION_SQL;
                EXECUTE STMT;
                DEALLOCATE PREPARE STMT;
        END IF;
END$$
DELIMITER ;
DELIMITER $$
CREATE PROCEDURE `partition_maintenance_all`(SCHEMA_NAME VARCHAR(32))
BEGIN
                CALL partition_maintenance(SCHEMA_NAME, 'history', 28, 24, 14);
                CALL partition_maintenance(SCHEMA_NAME, 'history_log', 28, 24, 14);
                CALL partition_maintenance(SCHEMA_NAME, 'history_str', 28, 24, 14);
                CALL partition_maintenance(SCHEMA_NAME, 'history_text', 28, 24, 14);
                CALL partition_maintenance(SCHEMA_NAME, 'history_uint', 28, 24, 14);
                CALL partition_maintenance(SCHEMA_NAME, 'trends', 730, 24, 14);
                CALL partition_maintenance(SCHEMA_NAME, 'trends_uint', 730, 24, 14);
END$$
DELIMITER ;
I know, this is a lot of stuff to process, but honestly it’s worth going through and setting it up properly. Zabbix is running flawlessly for us right now. This is a bit messy right now (yay wordpress) so in a day or so here’s a PDF version of the guide.
Cheers,
-M
I’m not saying this is illegal, but what I am saying is how the hell can they justify it being opt-out instead of opt-in?
You’re charging me a metric buttload of money for your service (which is, with all regards, pretty craptacular) and then using my electricity to provide free, public access wireless networks without my permission?
Using potentially my bandwidth (the copper can only provide so much, with TV and my internet access and now someone else’s internet access) and not giving us anything in return?
Pretty ballsy Comcast. Pretty ballsy.

So, we’ve been having problems with our Buffalo WZR-HP-G300NH Rev 1 running the last beta firmware (V24-SP2 build 19484 beta) from 8/9/12. It’s been showing signs of problems lately, specifically with WiFi dropping out seemingly at random and preventing clients from reconnecting until we reboot the box. A very frustrating problem to have, to say the least.
The plan was to go ahead and upgrade, since the router is out of warranty as of 2 months ago. I had a couple in mind, specifically two Asus ones (RT-AC66R and RT-AC68R). They look pretty awesome, both support DD-WRT, and are pretty full featured (even without DD-WRT). However, I figured that instead of buying a new one I would at least try factory resetting the current one and then reprogramming it. I wanted to give it a go, so after work I sat down to get it done.
While I was copying down settings and information, I stumbled upon a thread ( Link ) from July of 2013 that basically had the same issues. The end user had grand results upgrading to standard DD-WRT (“And I am pleased to report that, near as I can tell, not only is my Buffalo router working, but it is working MUCH BETTER (no more dropped wifi connections) than before the upgrade. Yippee!”). I was confused though, because the latest version of DD-WRT for my router was listed as DD-WRT v24 preSP2 Beta 14896 from 2010. That was confusing. Reading more into the thread, he found that there was a sneaky place that BrainSlayer was putting the firmwares and that the website wasn’t fully updated ( Link ). Looking at the folder structure I determined that I could navigate my way to a more recent version than the 5/27/13 revision that was linked into the forums. I found my way to a build from 2/19/14 (Rev 23598) which is located here: Link. I downloaded both, even though from reading I would only need the Buffalo to DD-WRT one.
So I set upon flashing my Buffalo router. I did a factory reset first, as I always do. I then uploaded the firmware and waited. And waited. And waited. 10 minutes later, it was still blinking red. I waited another 10 minutes. Still blinking red. I unplugged the router, waited 30 seconds, and plugged it back in. The worst thing I could have hoped for: Solid Green Power, Solid Red Diagnostic lights. Every 45 seconds, all lights would flash and the thing would reset. A dreaded ‘brick’. Brick is in air quotes of course, because I don’t like the parlance of brick being misused. Brick to me means a device which is unworking and unrecoverable – basically a fancy paper weight. I severely borked my router though, because there was still a way to recover it. Thankfully I had a spare router handy, and plugged it in, and got the apartment back up and running. Time for dinner first.
So after eating (yummy lentils soup!) I sat down at my desk and reviewed the instructions for getting a bricked router back up and running. The steps and guides were fairly incomplete and didn’t work for me at first. Here’s the steps I had to take:
Huzzah! I now have DD-WRT running on my router! Everything is going smoothly finally. Time to wait a few weeks and see if everything will cooperate. I really would like to avoid paying for a new router if I can at all.