This post has been moved to it’s proper home: Nerds of the Rad Table.
You don’t want cable data caps—but a former FCC chairman does | Ars Technica
Wow, so, long story short, when can we get rid of this jackass? Clearly he’s in the pocket of some media company like TWC or Comcast. Caps like what he’s proposing are so anti-consumer that it’s beyond ridiculous.
You don’t want cable data caps—but a former FCC chairman does | Ars Technica.
Just, seriously, go away dude. You’re not welcome here.
Confessions of a Fat Man
So I’m going to start this off with a warning. This is going to be largely uncensored, unfiltered, unedited, shooting-from-the-hip kind of stuff. I’m trying to clear my head and make sense of a lot of things that are going on right now. It might change your impressions of me as a human being but that’s expected. It might not, but that’s also expected. Without further delay, here we go. I’m going to apologize in advance for the wall-of-text feel. There isn’t much in the way of graphics or paragraphing. It’s just a “turn on the editor and write” kind of moment that’s been building up for a few months.
Rolling Out An Android IDE
So for a while I’ve been trying to roll out an Android Development Environment on my desktop (both at work and at home) so I can start learning to develop applications for Android. It’s a lofty goal – my programming skills are usually limited to scripting languages like Python and PHP (with some HTML and ASP sprinkled in when I’m bored). I took Computer Science courses at Rutgers University, so I have a little background in Java which is also helpful. However, the biggest barrier to me starting Android development has always been getting the IDE setup. The guides in books (and on the web) have always been out of date by the time I’ve read them. This might be because Android changes so quickly through it’s iterations. Who knows. All I do know is that there is usually no branding on the page to indicate when it was written or the last time it was valid. This page will be different.
Written: 10/18/2013 – Verified Working: 1/29/2014
Steps To Install:
- Navigate to Java SE Downloads.
- Click Download below the Java JDK heading.
- Accept the license agreement by clicking the Radio Button at the top of the section for the latest kit (for me as of writing Java SE Development Kit 7u45)
- Download the installer for your flavor of Windows (or whatever OS you are using). I downloaded both the x86 and x64 because I wanted to make sure I was covered.
- Run the first of the two installers (if you did as I did and downloaded both) which is jdk-7u45-windows-i586.
- Click through the installation until it is complete.
- Run the second of the two installers which is jdk-7u45-windows-x64.
- Click through the installation until it is complete.
- Navigate to Android SDK.
- Click the “Download for Other Platforms” heading to reveal ADT Bundle and SDK Tools Only.
- Select the installer for your flavor of Windows (or whatever OS you are using). I downloaded installer_r22.2.1-windows. (As of 12/18/13, it is installer_r22.3)
- Launch the installer that you downloaded.
- Click through the installation (Install for anyone using this computer is recommended) until it is complete.
- Start the SDK Manager.
- Click the checkboxes next to:
- Android SDK Tools (22.2.1, as of 12/18/13 it is 22.3)
- Android SDK Platform-tools (18.0.1, as of 12/18/13 it is 19)
- Android SDK Build-tools (18.1.1)
- Android 4.0 (API 14) — Or whatever API you want if you’d like to have backwards compatibility with older devices
- Always keep an eye on the dashboard information provided by Google: Link. As of writing, 74% of Android devices are running a version of Android > 4.0, so that’s a safe bet minimum to start with. Dropping down to Android 2.3.3 gets you to 98%, but reduces the feature set immensely). As of this writing, Android 4.4 (API 19) is available for development, but that accounts for a whopping 1% of devices.
- Android Support Repository (2, as of 12/18/13 it is 3)
- Android Support Library (18, as of 12/18/13 it is 19)
- Google Repository (3, as of 12/18/13 it is 4)
- Google USB Driver (8)
- Click Install packages…
- Accept the required license agreements (or stop here because you can’t go any further).
- Wait (for a long time) until the installation is complete.
- Setup an AVD:
- Launch the AVD Manager from the Start Menu.
- Click New…
- Type in a name in the AVD Name: field.
- Select Nexus 4 (4.7″, 768×1280: xhdpi) from the Device: field.
- Select Android 4.3 – API Level 18 from the Target: field (or whatever you selected in Step 15, Substep 4).
- Select ARM (armeabi-v7a) from the CPU/ABI: field.
- Adjust the Memory Options:, RAM: to 1024.
- Adjust Internal Storage: to 1024 MiB.
- Adjust SD Card:, Size: to 1024 MiB.
- Click the check box next to Use Host GPU.
- Click OK.
- Select it from the list of AVD’s.
- Click Start…
- (Optional): If you get an error “Failed to allocate memory: 8” error with an emulator-arm.exe has stopped working message you must go to: C:\Users\<windows username>\.android\avd\<avd name>.avd\config.ini and change the line hw.ramSize=1024 to hw.ramSize=1024MB. Try restarting the AVD. It should work.
- You may now close the emulator window. We don’t need it until we setup Eclipse, our IDE.
- Navigate to Eclipse.
- Download Eclipse Standard (x, as of writing 4.3.1) for your flavor of Operating System. I selected Windows x64.
- Extract the archive to the root of your C drive (it should now be in a folder C:\Eclipse).
- Once it is extracted, run eclipse.exe
- Create a workspace for your Android development projects. Typically: C:\Users\<windows username>\workspace\Android. If all you’re going to do is Android development, go ahead and click the default box.
- Once Eclipse loads we need to load the ADT plugins. Click Help and then Install New Software.
- Click Add at the top of the new window.
- You can name this new repository whatever you’d like, but the location field must be:
https://dl-ssl.google.com/android/eclipse/
- Once it loads, click the check box next to Developer Tools and then click Next >.
- Click Next > again.
- Accept the licenses and click Finish. Let the software install (it will take a small amount of time to download and install it).
- Click OK when you get the warning about unsigned content. It’s ok I promise!
- Click Yes when prompted to restart.
- Click Yes or No to sending usage statistics. It’s isn’t required but is helpful.
- Click Window and then click Preferences. Select Android from the list.
- Verify that the SDK location is correct and that you have the API level you selected in Step 15 Substep 4.
- Now all we need to do is link our AVD to the IDE environment.
- Click the X to the top left in the “Welcome Screen” window.
- All done!
Testing Your IDE:
- Click File, click New, click Project.
- Select the Android folder and select Android Application Project.
- Fill in the details.
- Application Name: is what the application will be called. For this I used: Testing IDE Settings.
- Project Name: typically gets auto-generated, you may leave it alone unless you really want to change it.
- Package Name: is usually the application name put after your webhost, if you have one. For example mine was: org.homenet.talesofatech.testingidesettings.
- Make sure the SDK/Compile With settings match. This is where you determine what the minimum and required levels of the Android version are.
- Click Next >.
- Uncheck Create custom launcher icon. Click Next >.
- Click Next > again.
- Click Finish.
- Now we need to link an AVD to this project in the IDE. Click Run and then click Run Configurations.
- Double click on Android Application.
- Change the name to Test Configuration
- Click Browse and select your project name.
- Click the Target tab and click the check box to the left of the name of your AVD.
- Click Apply and then click Run.
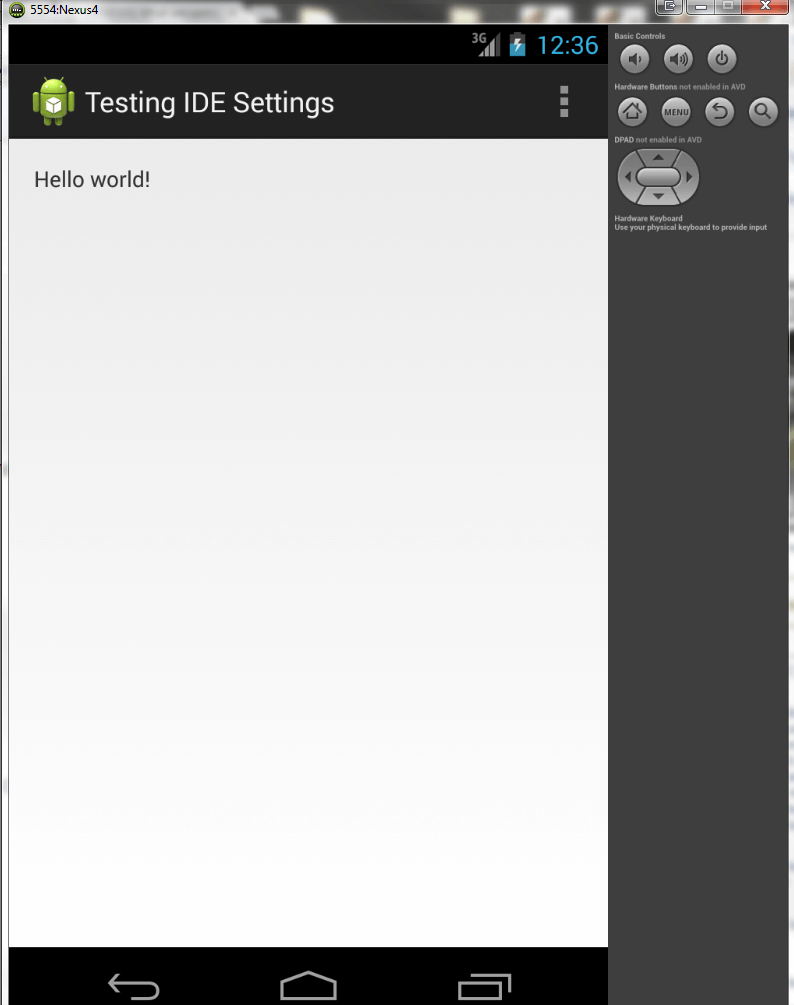
- If all is working, you should see the AVD system start up and then load your app, as in the screenshot:

- Note: if you get a message about Logcat, you can click OK. It’s for troubleshooting and diagnostics, which you’ll probably need later.
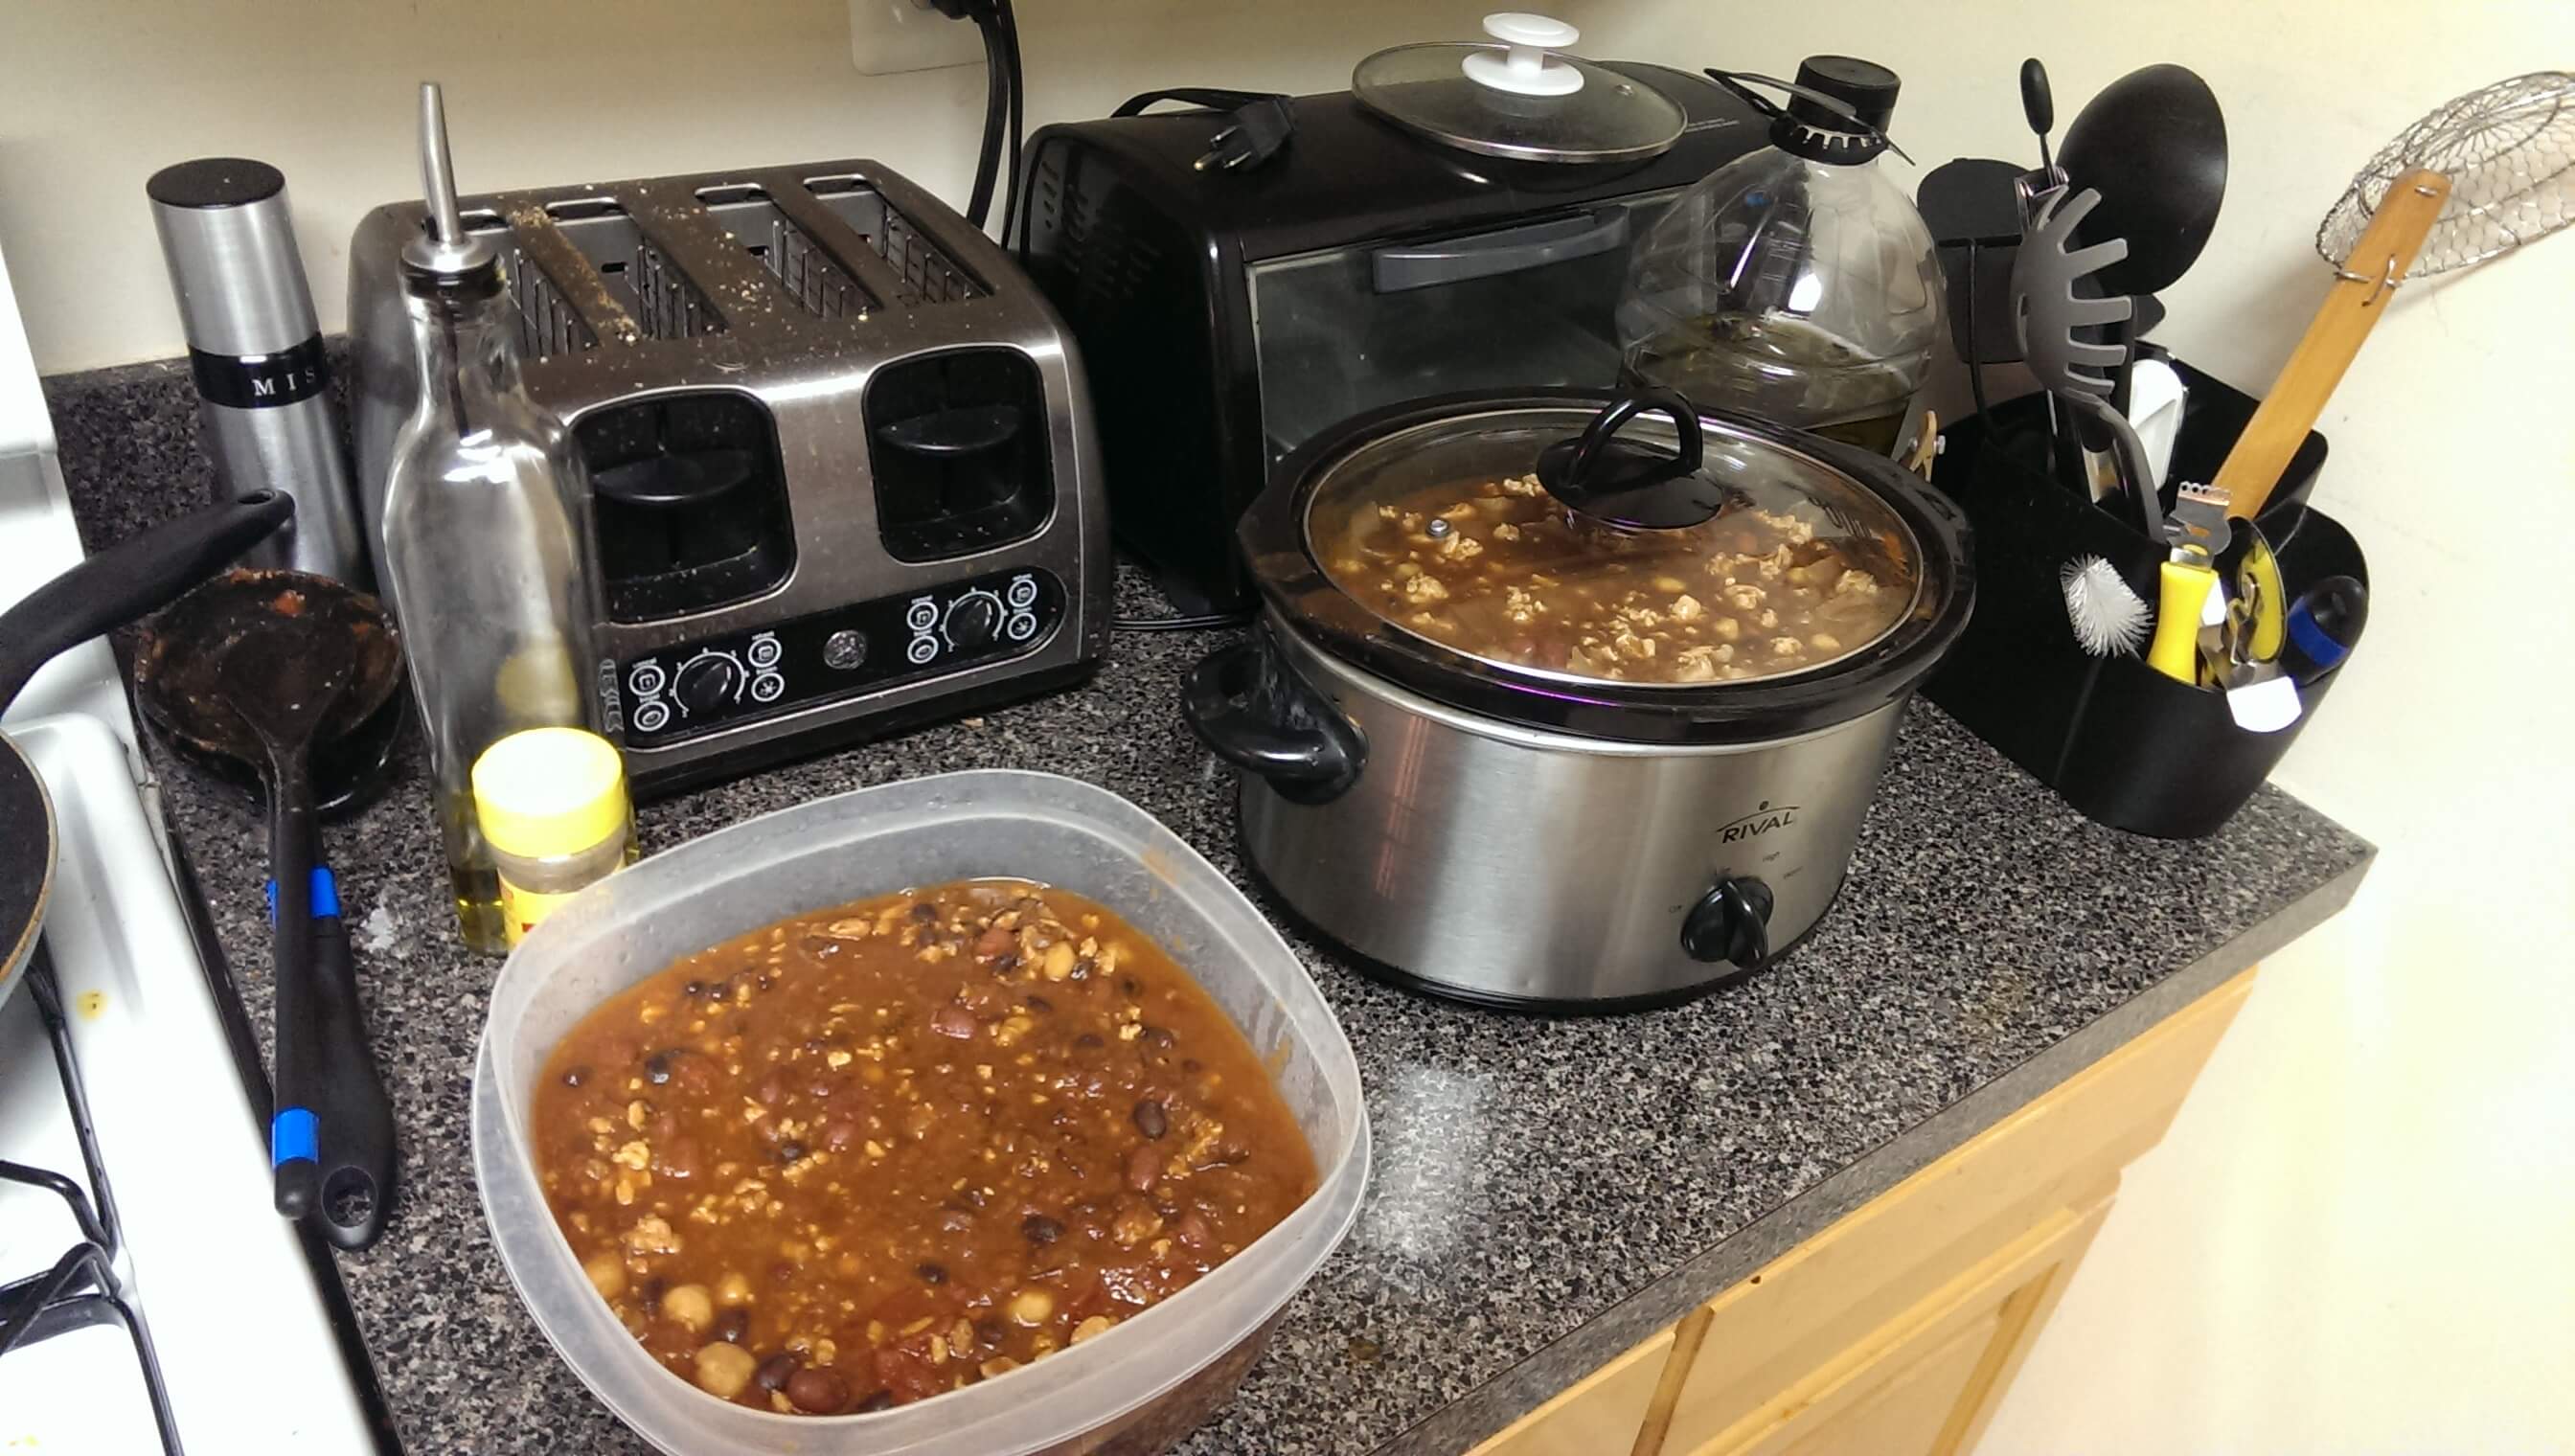
3 Bean Turkey Chili!
This is a recipe I once again shamelessly steal from another site, Skinny Taste. It is delicious and SO easy to make. I made a double because I wanted enough to last a week. Here’s what I used:
- 2.6 lb (40oz) 99% Fat Free Ground Turkey Breast
- 2 Large White Onions
- 2 (28oz) cans of diced tomatoes (56oz total)
- 2 (16oz) cans of tomato sauce (32oz total)
- 2 (4.5oz) cans of chopped chilis, drained (9oz total)
- 2 (15oz) cans of chickpeas, undrained (30oz total)
- 2 (15.5oz) cans of black beans, undrained (31oz total)
- 2 (15.5oz) cans of small red beans, undrained (31oz total)
- 4 tbsp chili powder
For the toppings:
- Red Onion, chopped
- Fresh Cilantro, chopped
- Cheddar Cheese, shredded
Directions:
- Chop and slice turkey, then brown it in a skillet with the onions.
- Cook the turkey until no longer pink.
- Add beans, chilies, chickpeas, tomatoes, tomato sauce, and chili powder to the crock pot and mix well.

- Drain fat from the pan, and transfer the turkey to the crock pot.

- Cook on high 6-8 hours.
- Garnish with onions, cilantro, and cheese (these ingredients not factored into the recipe nutrition info).


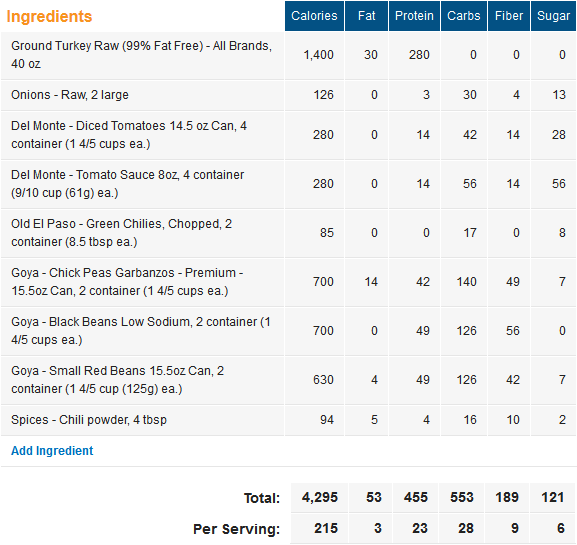
Made about 20 servings of roughly 3/4 a cup (205 grams) for me.
Nutrition info: 215 Calories, 3 Grams of Fat, 23 Grams of Protein, 28 Grams of Carbs, 9 Grams of Fiber, 6 Grams of Sugar.
This recipe will warm you to the very core, but isn’t overly spicy. Add some chopped jalapenos or some hot sauce to get that bonus kick.
Enjoy! 😀
Breakfast Stuffed Peppers!
This is a recipe I am shamelessly stealing from Paleo Grubs because it is fucking delicious AND healthy. I modified it a bit because I thought it would be delicious with just a little bit of shredded cheddar added on. Turns out I was right. It does add about 90 calories and 7 grams of fat per serving, so feel free to omit it if you want. It’s worth it in my book.
Ingredients:
- 4 Bell Peppers (about 24oz total; any color, the supermarket had a pack of 4 multi-color which was perfect for me!)
- 8 Large, Grade-A Eggs
- 2 Cups of Chopped, White Mushrooms (size after chopping, weight after chopping was approximately 6 oz)
- 2 Cups of Chopped Broccoli Florets (size after chopping, weight after chopping was approximately 6 oz)
- 1/2 Tsp Cayenne Pepper
- Salt and Pepper, To Taste
- 3/4 Cup of Shredded White Cheddar (I used Nature’s Promise Organic)
Directions:
- Preheat Oven to 375 F.
- Dice up your mushrooms and broccoli into small chunks.

- Crack eggs into a bowl. Sprinkle cayenne pepper, salt, and pepper onto eggs. Beat together with a whisk until consistent.

- Mix the eggs and chopped veggies together into a big bowl.
- Slice the peppers in half. Try to ensure a flat side. Green and Red Peppers seemed to be mostly symmetrical which allowed flat bottoms. I had problems with the Orange and Yellow Peppers.

- Fill the peppers with the mixture of broccoli, mushrooms, and cheese. I used a 2/3 cup measure and it seemed to fill each pepper pretty well!


- Place the peppers on a baking sheet and bake for approximately 35 minutes.

- After 35 minutes, pull the peppers out and top them with the shredded cheese.


- Bake for an additional 5 minutes, until the cheese has melted and is just starting to brown.


- Let cool for approximately 5 minutes.
- Slice in half, top with hot sauce (optional but delicious). Enjoy. 🙂


Serves approximately 4 (1 pepper each).
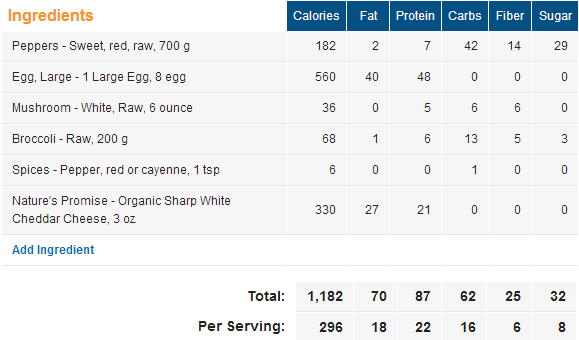
Nutrition Info:
296 Calories, 18 grams of fat, 22 grams of protein, 16 grams of carbohydrates, 6 grams of fiber, 8 grams of sugar.
Enjoy folks! This one is pretty damn tasty!
Pumpkin Protein Muffins!
This is a recipe I adapted from From Fries to Fit because it sounded all sorts of delicious and it is fall and I love pumpkin. With no further ado, here’s my adaptation of it.
- 8 Large Egg Whites
- 2 Cups Canned Pumpkin (I used Libby’s because it always tasted the best to me)
- 1 Cup Oat Flour (I took Quaker Oats and put them in a food processor. It took about 3 cups of Oats to make the 1 cup of Oat Flour)
- 2 Tsp Vanilla Extract (I used McCormick’s because it’s available and plentiful. Any kind should suffice)
- 4 Tbsp Honey (any kind, even the kind in a bear :P)
- 4 Scoops Vanilla Protein Powder (I used the Stop & Shop brand at 110 Calories a scoop with 20 grams of protein!)
- 1 Tsp Pumpkin Pie Spice
- 1/2 Tsp Cinnamon
- 1 Tsp Baking Powder
- 1/2 Cup Crushed Walnuts (optional)
- 2 Tbsp Butter (for allowing the muffins to slide out of the tin)
And here’s the recipe instructions, with pictures!
- Preheat Oven to 350 F.
- In a bowl or large measuring cup, mix pumpkin, egg whites, honey, and vanilla extract.

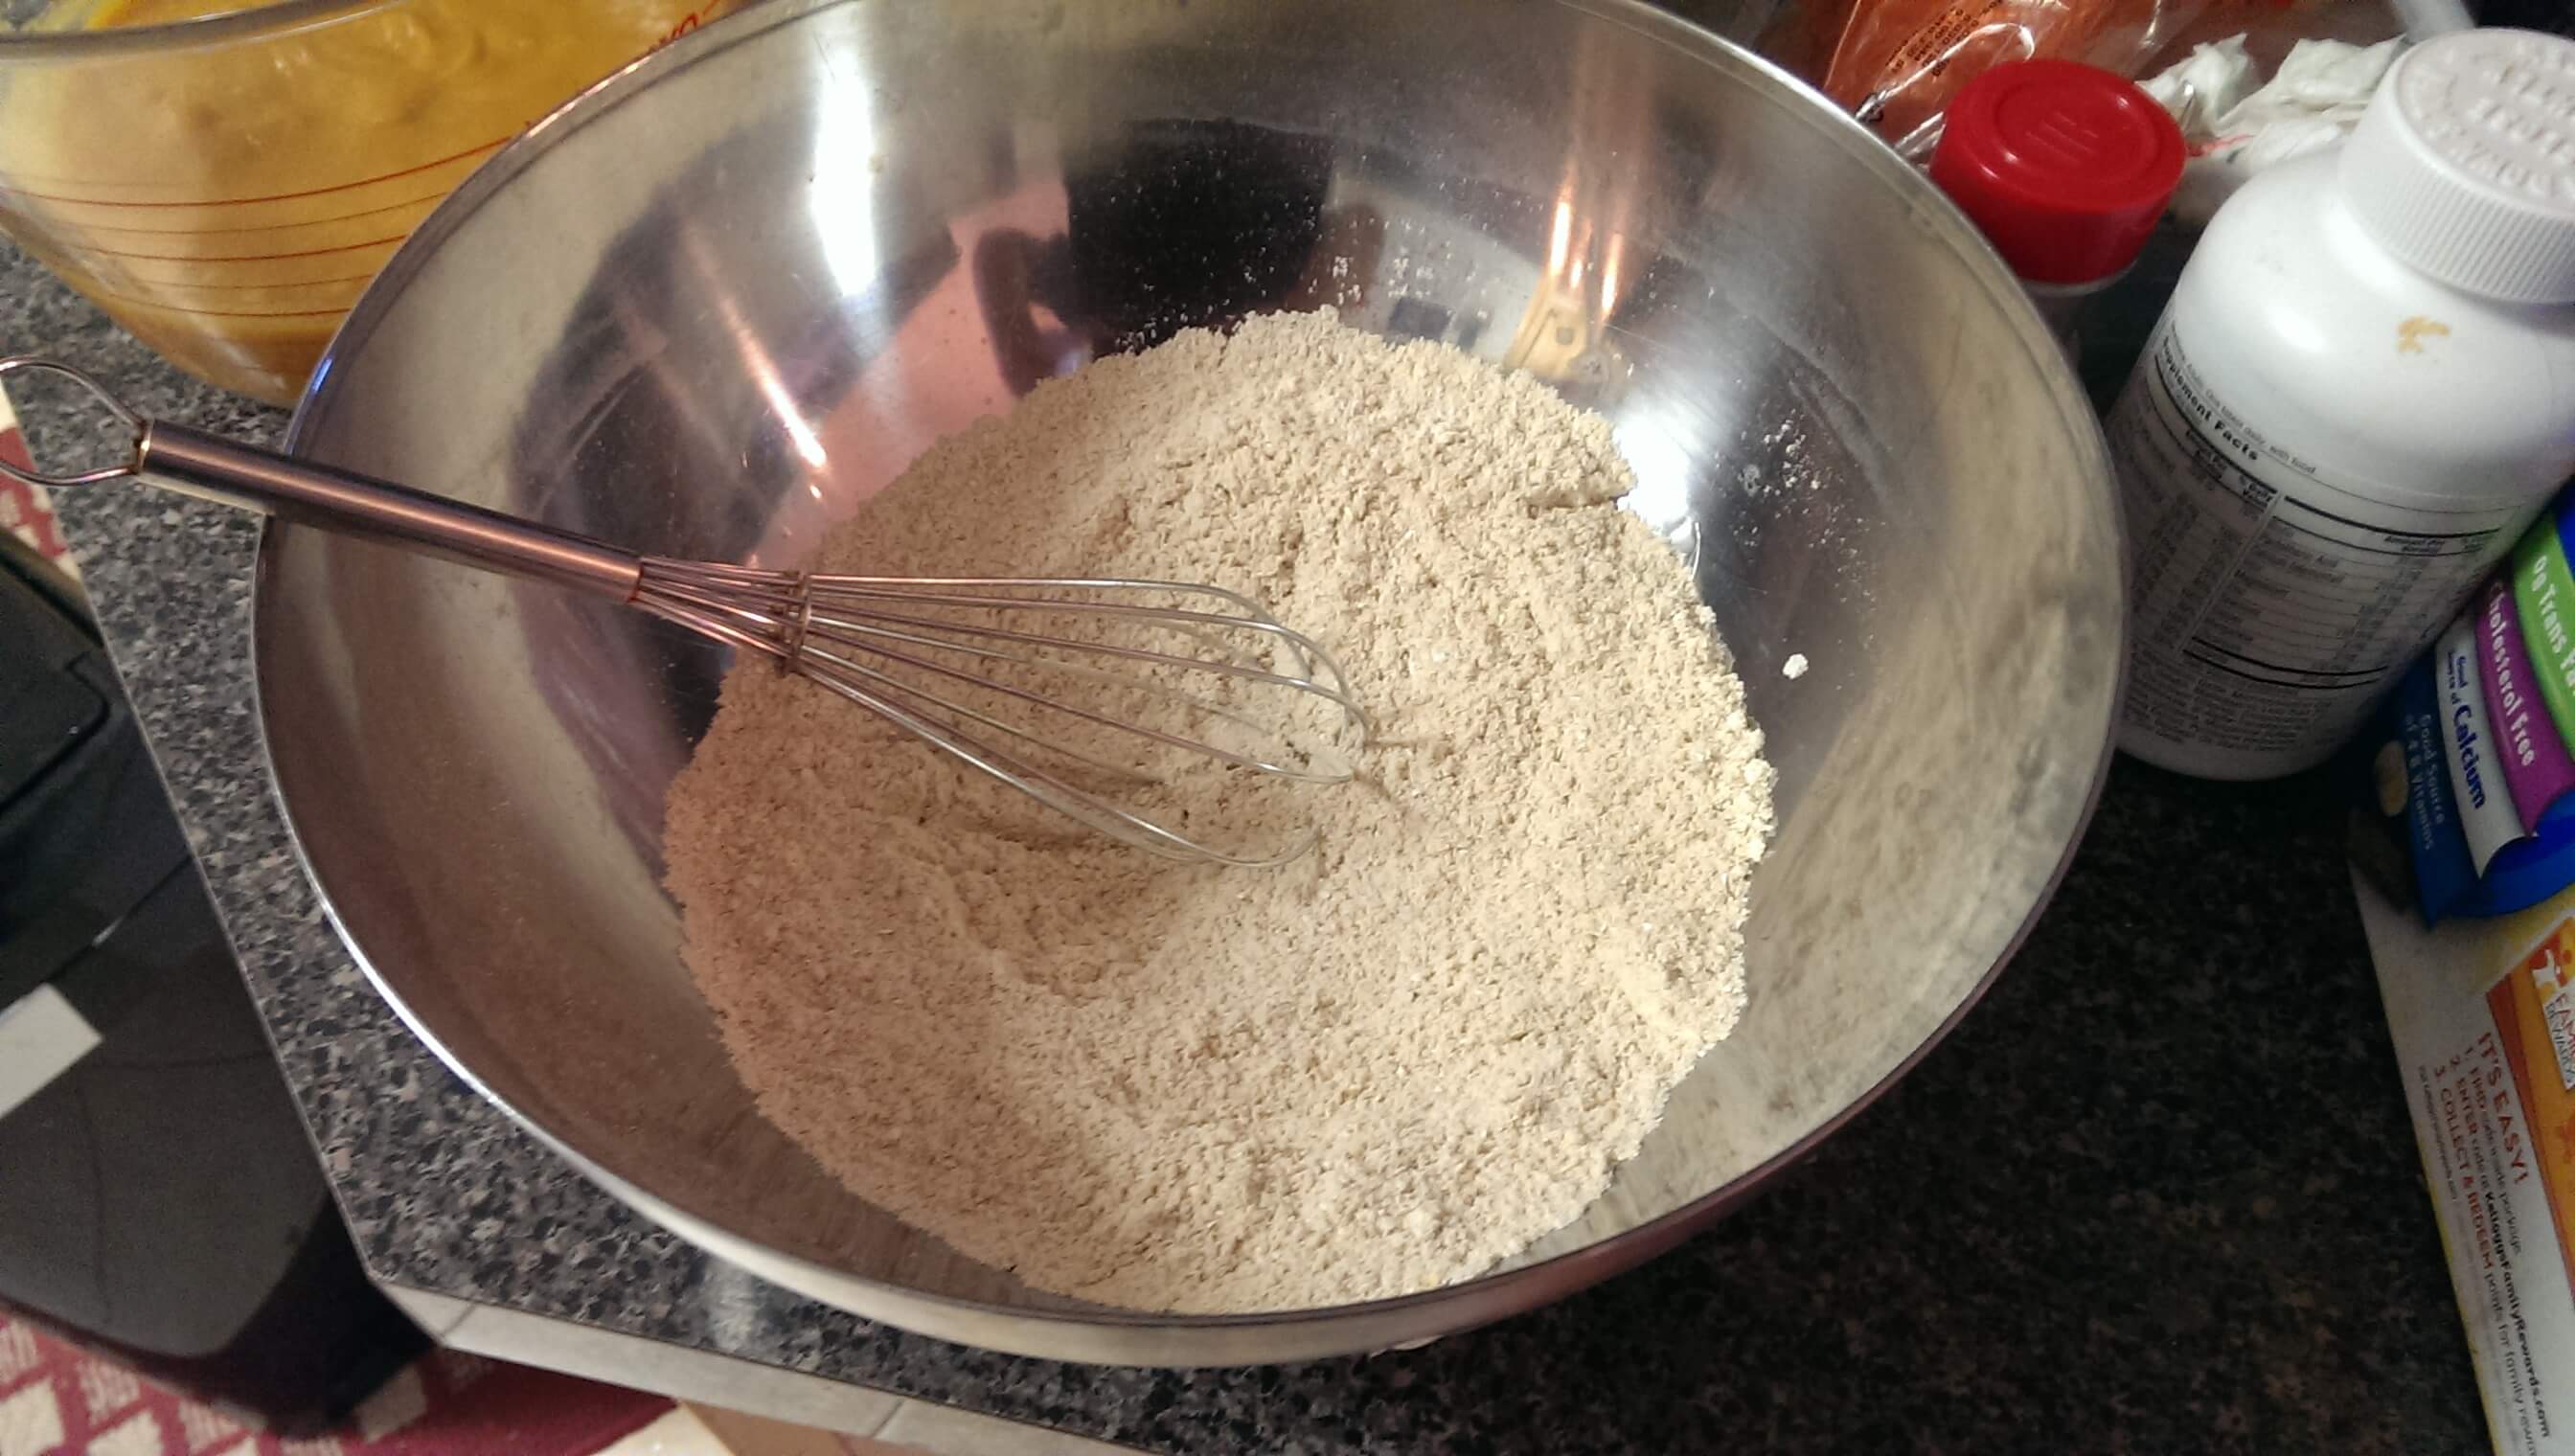
- In another bowl, whisk together protein powder, oat flour, spices, and baking powder. Get it as consistent as you can.

- Add the wet ingredients to the dry ingredient and whisk until smooth and consistent. If you used my method for the oat flour this will take some time and may not look 100%. It will be ok though! Just avoid clumps and pockets.

- Apply some butter to the inside of each tin in your muffin tin.
- Pour the mixture into your baking tins. I used about 1/3 cup per tin. You want it to fill the tin about 2/3 of the way to the top.

- Top with nuts if desired (as seen in the above picture)
- Bake for about 8 minutes, and rotate the baking tin in the oven 180 degrees.
- Bake additional 8 minutes, and test by poking the top with a tooth pick. If it comes out clean, you’re done! If not, bake an additional 2-3 minutes.

- Use a knife to get the edges clean of the tin, and the rest should just pop out! I learned the hard way about using the butter, I nearly ruined my first batch of muffins because they wouldn’t come out of the pan.


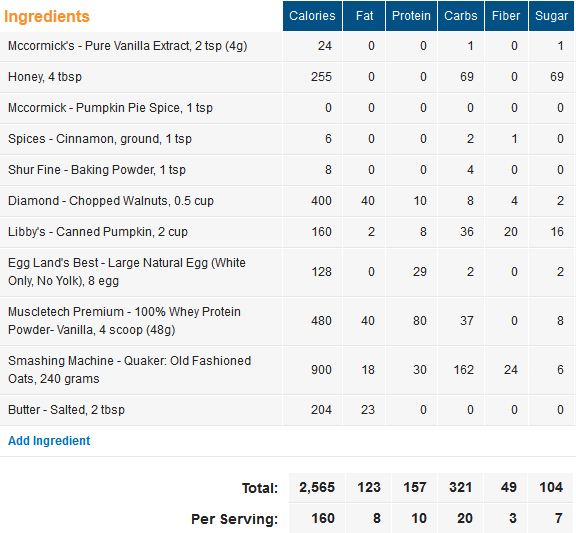
Enjoy these tasty, low-calorie, protein and pumpkin packed muffins!
160 Calories, 8 grams of fat, 10 grams of protein, 20 grams of carbs (3 grams of fiber, 7 grams of sugar) ~ 5 points.
Damaged DMD
So, at our district we have a LOT of projectors. 1 per class room, to be specific. 1 projector and 1 smart board per class room in most class rooms. It’s an amazing sight.
However, as a direct result of the large number of projectors, we also have a lot of projectors that kick the bucket.
The Dell 2400mp projectors are rock solid. They last for years and years and years. When they do kick the bucket, it’s because they have a bad color wheel. This is an $80 to $100 part, easy to replace and easy to acquire.
The other projectors we have are Dell 42×0 projectors. They are the worst pieces of junk we have ever worked with. When they kick the bucket (and boy howdy do they do it often) it’s because of a bad DMD. If you don’t know what a DMD is let me explain. DMD stands for Digital Mirror Display. It is an array of thousands of tiny mirrors. Each mirror is controlled separately. As a result, individual failures result in pixelation and spotting on the projector. This ruins the projector image. The replacement part is $250 to $300. It is also not easy to replace. This makes us sad.
What makes us smile though is just how damn pretty the damn thing is. Pictures:

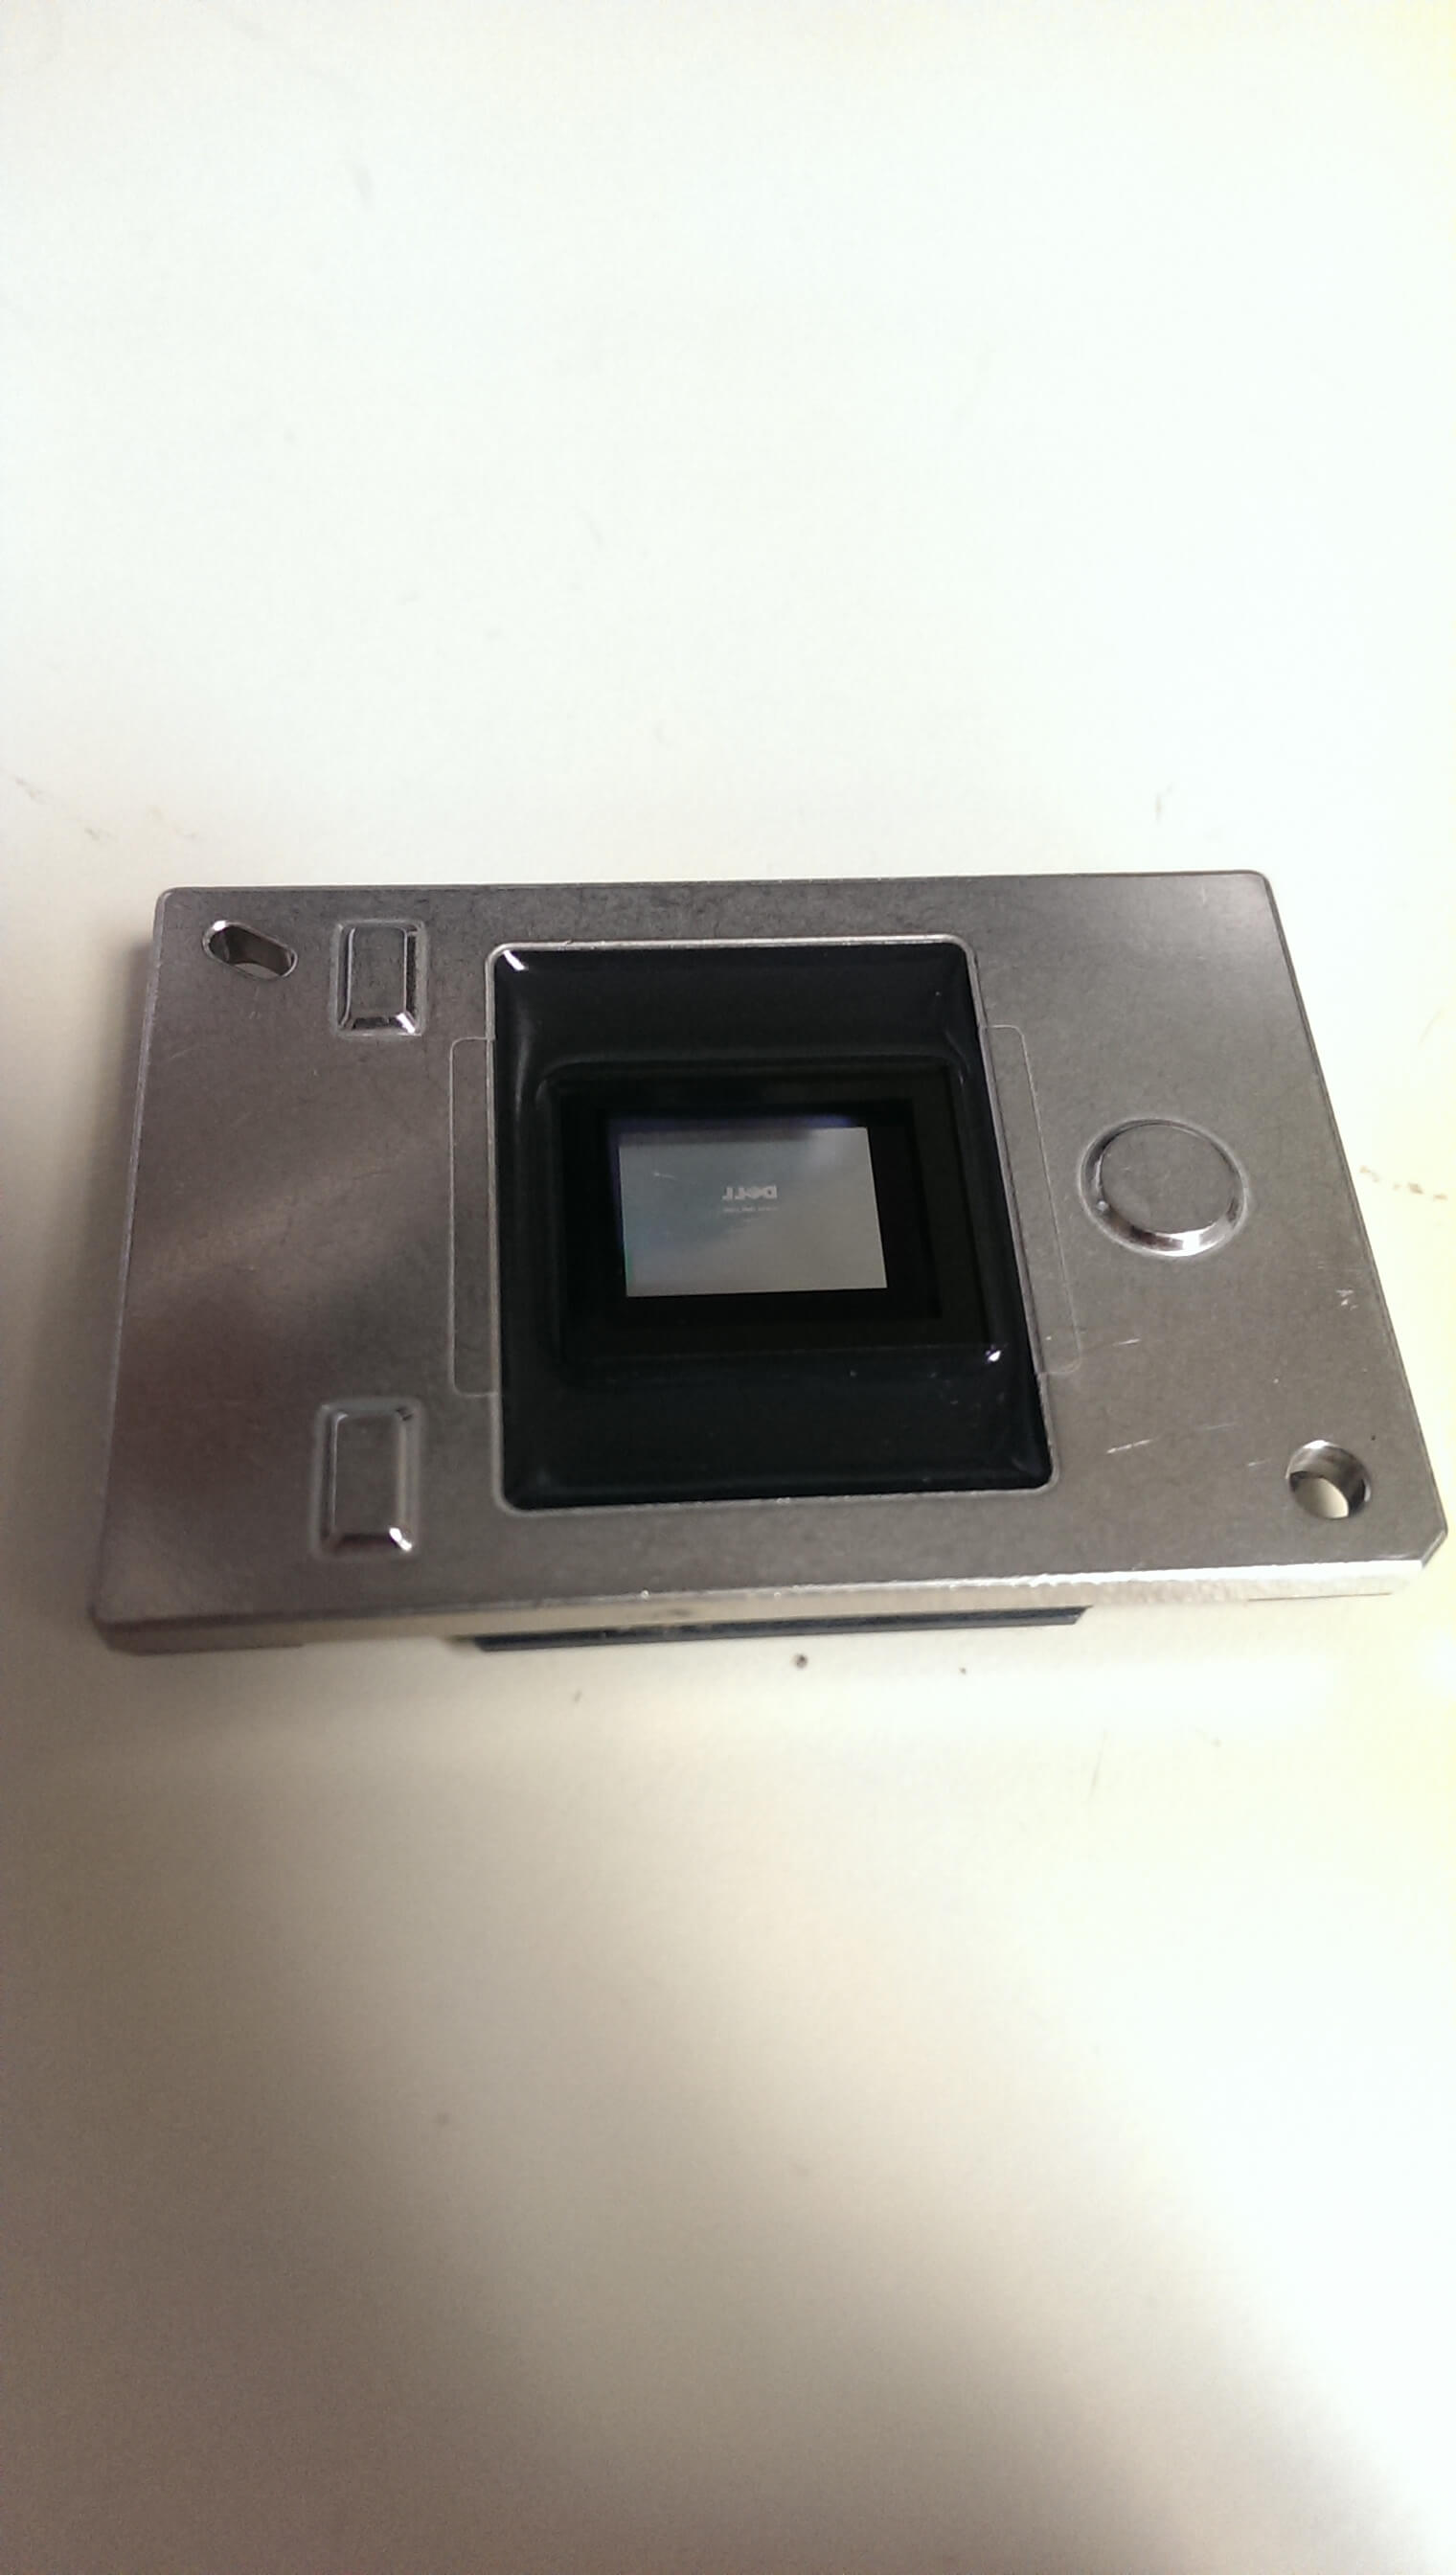
You can actually see the pixelation on the screen. You can also see the Dell logo in the center of it, from when we turned off the power while it was still displaying the image.
It’s an awesome little device. You can see each individual mirror. The image might not do it justice (phone cam) but trust me. It’s cool.
Dashcam Adventures, 10/4/13
http://www.youtube.com/watch?v=6N9pnMbOw0I
So… I just installed my new dashboard mount for my cell phone so I can use it as GPS & Dashboard Camera while driving! It’s pretty sweet and simple. It was installed 2 days ago by me and of course Dan because I am an idiot sometimes and break cables. ^_^;
So I’m driving back from a markout at work and BAM what do I see but an idiot run a red light to make an illegal left turn. He made a left turn while he had a red light, in a no turn on red zone. More traffic follows past him afterwards.
Yeah.
NJ drivers.
CHATHAM drivers, specifically. Entitled and asshatish.
What a day.
Edit 1: For those who are curious: I am using the DailyRoads Voyager app on my HTC One to record 1080p video. It records 5 minute video clips (adjustable) whenever I connect it to my car dashboard mount. It will reach a max file size of ~3 gb before deleting the oldest video file. You can tell it to keep the video files for an entire trip or delete them all at the end of the trip. It’s pretty sweet.
-M, out
A Good Challenge
Lately we’ve been encountering some rather frustrating issues at work. These issues have been piling up as we’ve been otherwise unable to find a solution to them. It was beginning to get maddening.
Let’s start from the top:
SPLWoW64 crash with error message: “The program cam’t start because x2utilHL.dll is missing from your computer. Try reinstalling the program to fix this problem.” This happened exclusively in 32-bit applications on a 64-bit operating system. This was a little difficult to figure out, but we think we finally got it. In our environment users get printers added through a login script that maps printers based on location and user. That is to say, if I login at building A on device 1a, I get printers X (and if I login on device 2b, I get printers Z) but if I login at building B on device 1b, I get printers C. At one building we have recently swapped to 64-bit Windows 7. The problem seemed to start when we got new Xerox multifunction printers. In looking at the queues on the print server, we see that the 32-bit print driver was not installed. So we installed it. The problems have slowly been trickling away. Of note: we had to completely remove the printers from machines, and then remove any printer ports, and then remove any installed printer drivers. The next time they logged in the problem went away. Fingers crossed.
Dell Latitude 2110 not getting WiFi access no matter what. It was weird. It had been working for 3 years with no problem, but all of a sudden this morning it wouldn’t connect to any of our secure networks (using a certificate). We reset winsock, we uninstalled and reinstalled the hardware, we updated the drivers, we did gpupdates, everything we could think of. We even cleared out DHCP entries on the DCs and white-listed it in the Aruba Wireless Controller to make sure it wasn’t getting black-listed for failed authentication attempts (which we were seeing). In the error logs we were seeing details about DHCP failed (DHCPNACK). None of the related google searches seemed to help. It’s been very frustrating and slow-going. We restore an image to the netbook and it works 100% fine. So weird. There must have been some deep-seated change to the OS that we just weren’t aware of. Maybe corruption somewhere, since users can’t make system-wide changes. Very frustrating. It takes about 2 hours to image and deploy packages to a netbook. 2 hours for what should be a simple fix. Go figure. I’m sure there’s an easier method but I’m just missing it.
These were fun challenges to try and figure out. I love a good challenge. I even love a good challenge that I can actually complete and figure out. It’s very rewarding to me. Helping people as a general rule makes me feel all warm n’ fuzzy inside.
This week has been a good week. People have been thanking us for our hard work. That’s a rare treat, and I think I will savor it for the weekend.
It is nice to be appreciated for the effort we put in to our jobs.
I hope you all get the same courtesy at yours. Enjoy your weekend folks.
-M